
SpringBoot 与 Shiro 整合 (一)
一、shiro简介
- Shiro是一个开源的java安全(权限)框架,它能够实现身份验证、授权、加密和会话管理等功能。
- Shiro是apache旗下的产品,它的官网是: shiro官网: Apache Shiro
- Shiro不仅可以用于javaEE环境,也可以用于javaSE
二、shiro功能
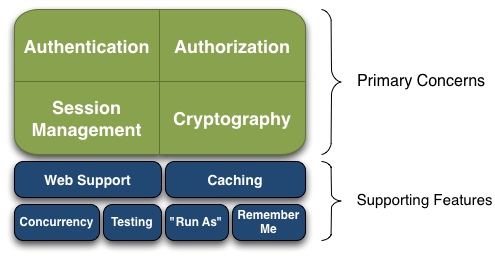 Authentication:身份认证 / 登录,验证用户是不是拥有相应的身份;
Authorization:授权,即权限验证,验证某个已认证的用户是否拥有某个权限;即判断用户是否能做事情,常见的如:验证某个用户是否拥有某个角色。或者细粒度的验证某个用户对某个资源是否具有某个权限;
Session Management:会话管理,即用户登录后就是一次会话,在没有退出之前,它的所有信息都在会话中;会话可以是普通 JavaSE 环境的,也可以是如 Web 环境的;
Cryptography:加密,保护数据的安全性,如密码加密存储到数据库,而不是明文存储;
Web Support:Web 支持,可以非常容易的集成到 Web 环境;
Caching:缓存,比如用户登录后,其用户信息、拥有的角色 / 权限不必每次去查,这样可以提高效率;
Concurrency:shiro 支持多线程应用的并发验证,即如在一个线程中开启另一个线程,能把权限自动传播过去;
Testing:提供测试支持;
Run As:允许一个用户假装为另一个用户(如果他们允许)的身份进行访问;
Remember Me:记住我,这个是非常常见的功能,即一次登录后,下次再来的话不用登录了。
三、shiro的核心组件
首先,我们从外部来看 Shiro,即从应用程序角度的来观察如何使用 Shiro 完成工作。如下图:
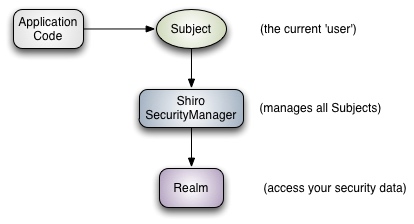
Subject:主体,代表了当前 “用户”,这个用户不一定是一个具体的人,与当前应用交互的任何东西都是 Subject,如网络爬虫,机器人等;即一个抽象概念;所有 Subject 都绑定到 SecurityManager,与 Subject 的所有交互都会委托给 SecurityManager;可以把 Subject 认为是一个门面;SecurityManager 才是实际的执行者;
SecurityManager:安全管理器;即所有与安全有关的操作都会与 SecurityManager 交互;且它管理着所有 Subject;可以看出它是 Shiro 的核心,它负责与后边介绍的其他组件进行交互,如果学习过 SpringMVC,你可以把它看成 DispatcherServlet 前端控制器;
Realm:域,Shiro 从从 Realm 获取安全数据(如用户、角色、权限),就是说 SecurityManager 要验证用户身份,那么它需要从 Realm 获取相应的用户进行比较以确定用户身份是否合法;也需要从 Realm 得到用户相应的角色 / 权限进行验证用户是否能进行操作;可以把 Realm 看成 DataSource,即安全数据源。
也就是说对于我们而言,最简单的一个 Shiro 应用:
应用代码通过 Subject 来进行认证和授权,而 Subject 又委托给 SecurityManager;
我们需要给 Shiro 的 SecurityManager 注入 Realm,从而让 SecurityManager 能得到合法的用户及其权限进行判断。
从以上也可以看出,Shiro 不提供维护用户 / 权限,而是通过 Realm 让开发人员自己注入。
接下来我们来从 Shiro 内部来看下 Shiro 的架构,如下图所示:
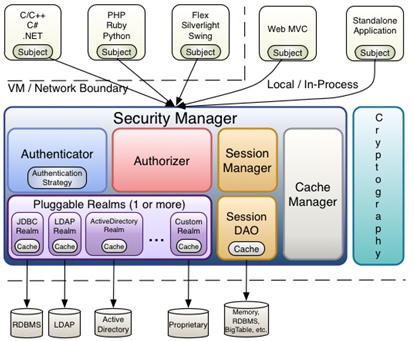
Subject:主体,可以看到主体可以是任何可以与应用交互的 “用户”;
SecurityManager:相当于 SpringMVC 中的 DispatcherServlet 或者 Struts2 中的 FilterDispatcher;是 Shiro 的心脏;所有具体的交互都通过 SecurityManager 进行控制;它管理着所有 Subject、且负责进行认证和授权、及会话、缓存的管理。
Authenticator:认证器,负责主体认证的,这是一个扩展点,如果用户觉得 Shiro 默认的不好,可以自定义实现;其需要认证策略(Authentication Strategy),即什么情况下算用户认证通过了;
Authrizer:授权器,或者访问控制器,用来决定主体是否有权限进行相应的操作;即控制着用户能访问应用中的哪些功能;
Realm:可以有 1 个或多个 Realm,可以认为是安全实体数据源,即用于获取安全实体的;可以是 JDBC 实现,也可以是 LDAP 实现,或者内存实现等等;由用户提供;注意:Shiro 不知道你的用户 / 权限存储在哪及以何种格式存储;所以我们一般在应用中都需要实现自己的 Realm;
SessionManager:如果写过 Servlet 就应该知道 Session 的概念,Session 呢需要有人去管理它的生命周期,这个组件就是 SessionManager;而 Shiro 并不仅仅可以用在 Web 环境,也可以用在如普通的 JavaSE 环境、EJB 等环境;所以呢,Shiro 就抽象了一个自己的 Session 来管理主体与应用之间交互的数据;这样的话,比如我们在 Web 环境用,刚开始是一台 Web 服务器;接着又上了台 EJB 服务器;这时想把两台服务器的会话数据放到一个地方,这个时候就可以实现自己的分布式会话(如把数据放到 Memcached 服务器);
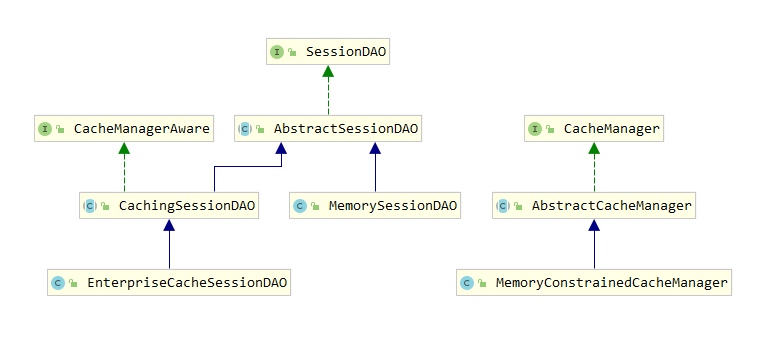
SessionDAO:DAO 大家都用过,数据访问对象,用于会话的 CRUD,比如我们想把 Session 保存到数据库,那么可以实现自己的 SessionDAO,通过如 JDBC 写到数据库;比如想把 Session 放到 Memcached 中,可以实现自己的 Memcached SessionDAO;另外 SessionDAO 中可以使用 Cache 进行缓存,以提高性能;
CacheManager:缓存控制器,来管理如用户、角色、权限等的缓存的;因为这些数据基本上很少去改变,放到缓存中后可以提高访问的性能
Cryptography:密码模块,Shiro 提高了一些常见的加密组件用于如密码加密 / 解密的。
四、快速开始
4.1、导入坐标
<!--shiro-->
<dependency>
    <groupId>org.apache.shiro</groupId>
    <artifactId>shiro-spring</artifactId>
    <version>1.6.0</version>
</dependency>
4.2、自定义Realm
package com.yingside.springbootdemo.shiro;

import org.apache.shiro.authc.AuthenticationException;
import org.apache.shiro.authc.AuthenticationInfo;
import org.apache.shiro.authc.AuthenticationToken;
import org.apache.shiro.authz.AuthorizationInfo;
import org.apache.shiro.realm.AuthorizingRealm;
import org.apache.shiro.subject.PrincipalCollection;

public class UserRealm extends AuthorizingRealm {

    @Override
    protected AuthorizationInfo doGetAuthorizationInfo(PrincipalCollection principalCollection) {
        System.out.println("执行授权逻辑");
        return null;
    }

    @Override
    protected AuthenticationInfo doGetAuthenticationInfo(AuthenticationToken authenticationToken) throws AuthenticationException {
        System.out.println("执行认证逻辑");
        return null;
    }
}
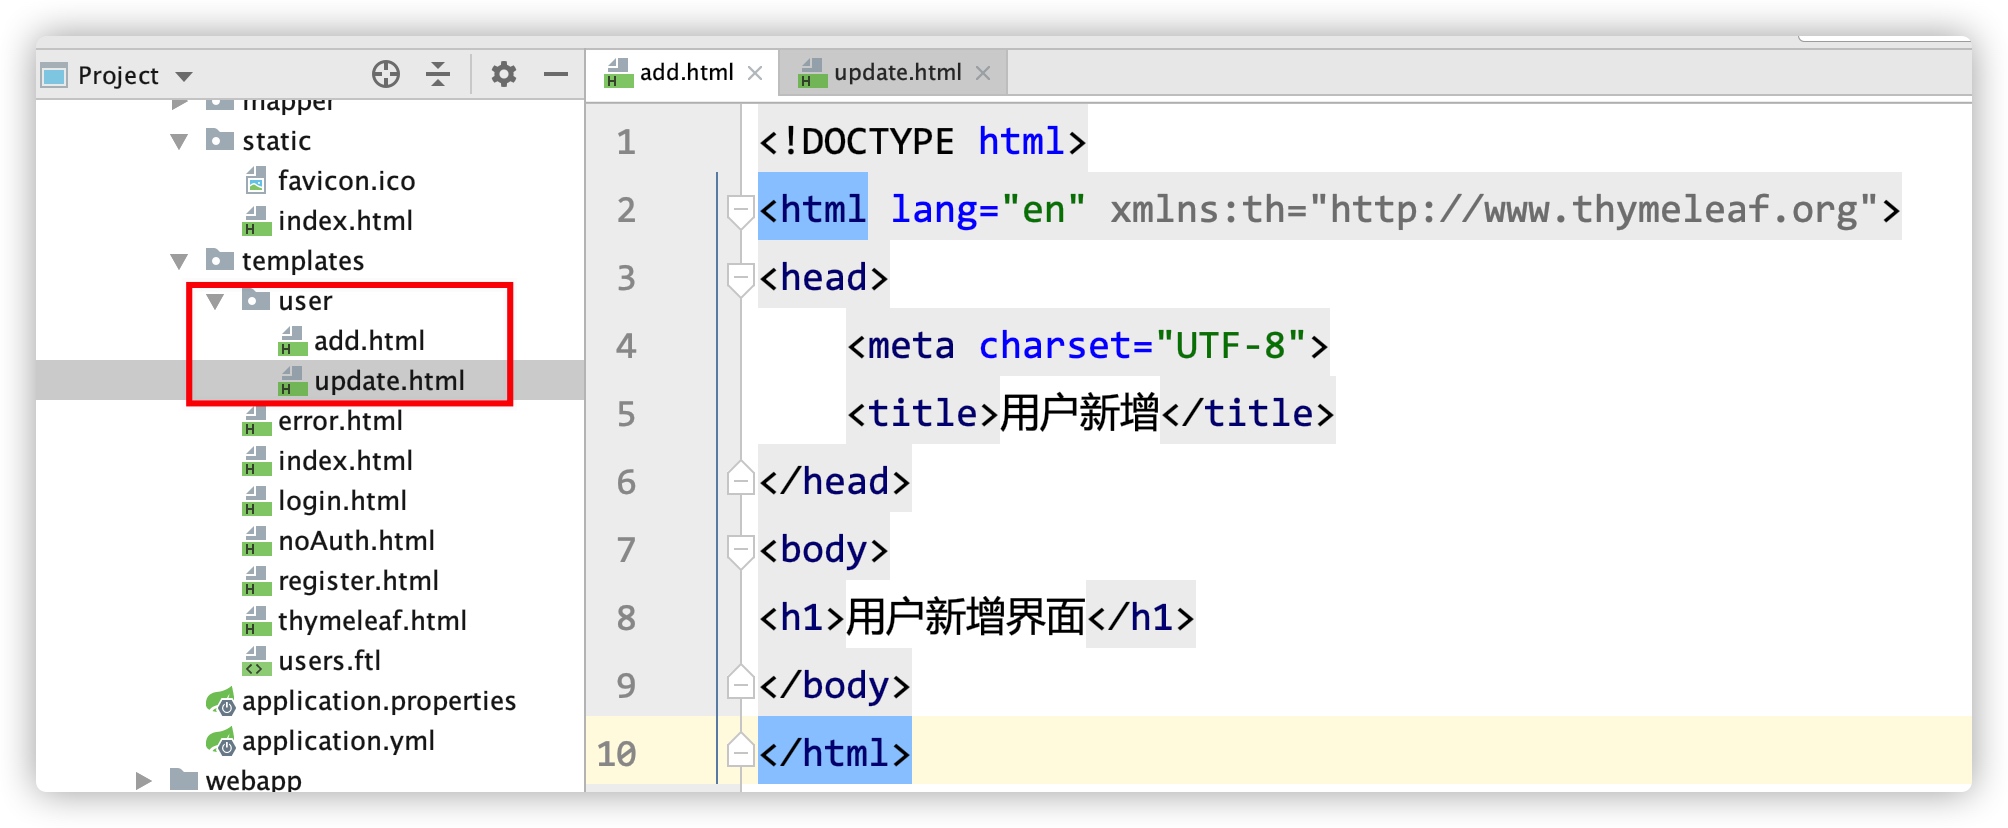
4.3、页面资源
新增:add.html
<!DOCTYPE html>
<html lang="en" xmlns:th="http://www.thymeleaf.org">
<head>
    <meta charset="UTF-8">
    <title>用户新增</title>
</head>
<body>
<h1>用户新增界面</h1>
</body>
</html>
更新:update.html
<!DOCTYPE html>
<html lang="en" xmlns:th="http://www.thymeleaf.org">
<head>
    <meta charset="UTF-8">
    <title>用户更新界面</title>
</head>
<body>
<h1>用户更新界面</h1>
</body>
</html>
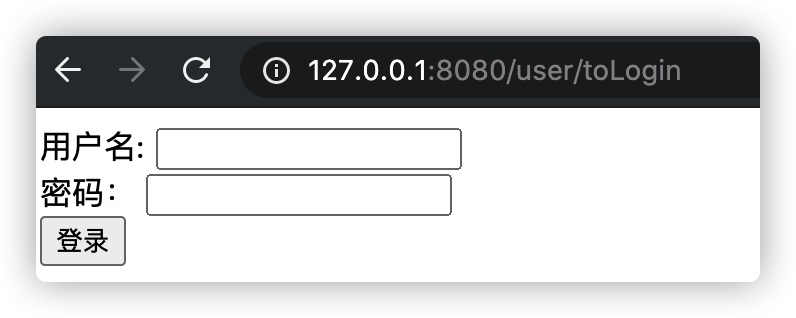
登录:login.html
<!DOCTYPE html>
<html lang="en" xmlns:th="http://www.thymeleaf.org">
<head>
    <meta charset="UTF-8">
    <title>Title</title>
</head>
<body>
<span th:text="${msg}"></span>
<form th:action="@{/user/login}" method="post">
    用户名: <input type="text" name="username"> <br>
    密码: <input type="password" name="password"> <br>
    <input type="submit" value="登录">
</form>
</body>
</html>
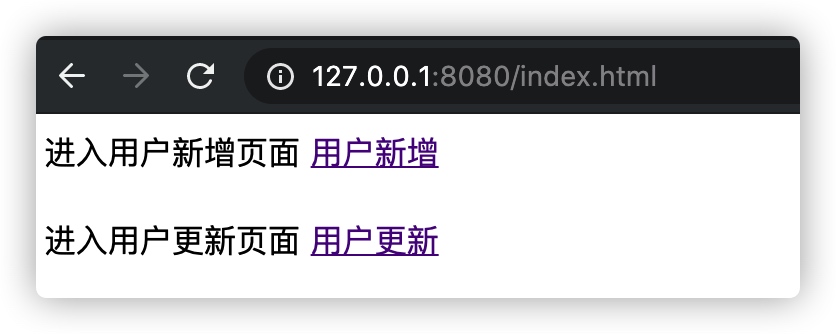
纯静态页面index.html
<!DOCTYPE html>
<html lang="en">
<head>
    <meta charset="UTF-8">
    <link rel="icon" href="favicon.ico" type="image/x-icon">
    <title>Title</title>
</head>
<body>
进入用户新增页面 <a href="/user/add">用户新增</a>
<br><br>
进入用户更新页面 <a href="/user/update">用户更新</a>
</body>
</html>
文件在项目中的位置
4.4、后台Controller
@Controller
@RequestMapping("/user")
public class UserController {
    @RequestMapping("/add")
    public String add(){
        return "user/add";
    }

    @RequestMapping("/update")
    public String update(){
        return "user/update";
    }

    @RequestMapping("/toLogin")
    public String toLogin(){
        return "login";
    }
}
4.5、shiro基本配置类
@Configuration
public class ShiroConfig {
    @Bean("userRealm")
    public UserRealm getUserRealm(){
        return new UserRealm();
    }

    @Bean("securityManager")
    public DefaultWebSecurityManager getDefaultWebSecurityManager(UserRealm userRealm){
        DefaultWebSecurityManager securityManager = new DefaultWebSecurityManager();
        securityManager.setRealm(userRealm);
        return securityManager;
    }

    @Bean
    public ShiroFilterFactoryBean getFilterFactoryBean(DefaultWebSecurityManager securityManager){
        ShiroFilterFactoryBean shiroFilterFactoryBean = new ShiroFilterFactoryBean();
        shiroFilterFactoryBean.setSecurityManager(securityManager);
        //设置登录url
        shiroFilterFactoryBean.setLoginUrl("/user/toLogin");

        Map<String,String> map = new LinkedHashMap<>();
        map.put("/index","anon");
        map.put("/user/add","authc");
        map.put("/user/update","authc");

        shiroFilterFactoryBean.setFilterChainDefinitionMap(map);

        return shiroFilterFactoryBean;
    }
}
Filter相关解释
| Filter | 解释 |
|---|---|
| anon | 无参,开放权限,可以理解为匿名用户或游客 |
| authc | 无参,需要认证 |
| logout | 无参,注销,执行后会直接跳转到shiroFilterFactoryBean.setLoginUrl(); 设置的 url |
| authcBasic | 无参,表示 httpBasic 认证 |
| user | 无参,表示必须存在用户,当登入操作时不做检查 |
| ssl | 无参,表示安全的URL请求,协议为 https |
| perms[user] | 参数可写多个,表示需要某个或某些权限才能通过,多个参数时写 perms[“user, admin”],当有多个参数时必须每个参数都通过才算通过 |
| roles[admin] | 参数可写多个,表示是某个或某些角色才能通过,多个参数时写 roles[“admin,user”],当有多个参数时必须每个参数都通过才算通过 |
| rest[user] | 根据请求的方法,相当于 perms[user:method],其中 method 为 post,get,delete 等 |
| port[8081] | 当请求的URL端口不是8081时,跳转到schemal://serverName:8081?queryString 其中 schmal 是协议 http 或 https 等等,serverName 是你访问的 Host,8081 是 Port 端口,queryString 是你访问的 URL 里的 ? 后面的参数 |
public enum DefaultFilter {
    anon(AnonymousFilter.class),
    authc(FormAuthenticationFilter.class),
    authcBasic(BasicHttpAuthenticationFilter.class),
    authcBearer(BearerHttpAuthenticationFilter.class),
    logout(LogoutFilter.class),
    noSessionCreation(NoSessionCreationFilter.class),
    perms(PermissionsAuthorizationFilter.class),
    port(PortFilter.class),
    rest(HttpMethodPermissionFilter.class),
    roles(RolesAuthorizationFilter.class),
    ssl(SslFilter.class),
    user(UserFilter.class),
    invalidRequest(InvalidRequestFilter.class);
    ......
}
上面的配置还需要注意几个细节:
1、Map需要new的是LinkedHashMap<>()
2、往Map中put值的时候,最好讲anon写在最前面
3、如果没有配置shiroFilterFactoryBean.setLoginUrl会自动跳转到login.jsp页面
4.6、测试
点击新增或者更新,由于需要验证,直接会跳转到我们自定义的login页面
五、shiro认证
上面的快速开始,相当于加入了shiro,就加入了一个过滤器的功能了,而且是一个全局过滤,哪些页面要过滤,哪些页面不过滤。
注意:
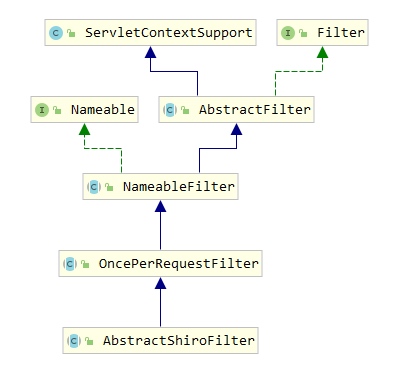
Shiro框架在URL级别的权限过滤上是基于Filter实现的。Shiro框架在我们配置的ShiroFilterFactoryBean进行初始化调用getBean()的时候就做了很多初始化操作,将我们配置的过滤器规则一步步添加对应的过滤器到过滤器执行链中,这个执行链最终被放入执行链解析器。当有请求到达Tomcat时,通过Tomcat中的Filter责任链执行流程,最终Shiro所定义的AbstractShiroFilter.doFilter()被执行,那么它会去获取执行链解析器,通过解析器拿到执行链中的过滤器并执行,这样就实现了基于URL的权限过滤。
至于用户该怎么过滤,就需要我们编写代码了。
在Controller中添加login验证
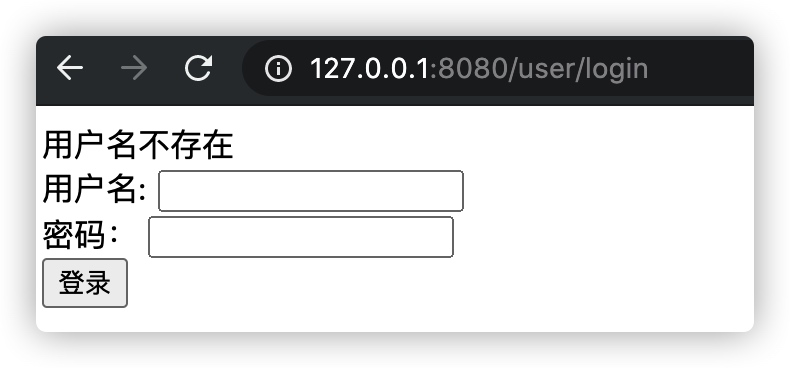
@RequestMapping("/login")
public String login(String username,String password,ModelMap model){
System.out.println("username = " + username);
//获取Subject
Subject subject = SecurityUtils.getSubject();
//封装用户数据
UsernamePasswordToken token = new UsernamePasswordToken(username, password);
//执行登录方法
//只需要执行login方法,就会自动去执行UserRealm中的认证逻辑
try {
subject.login(token);
return "redirect:/index.html";
} catch (UnknownAccountException e) {
model.addAttribute("msg","用户名不存在");
e.printStackTrace();
return "login";
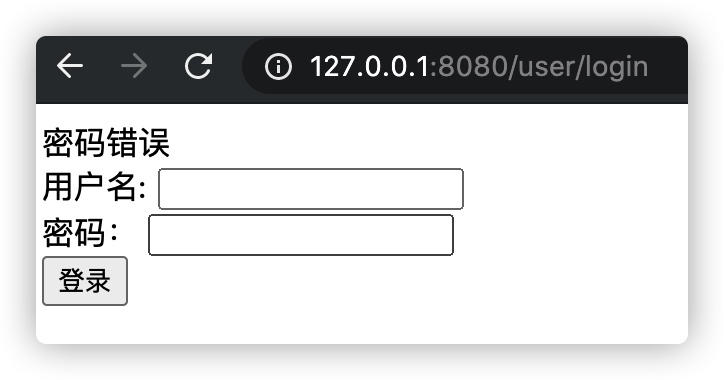
} catch(IncorrectCredentialsException e){
model.addAttribute("msg","密码错误");
e.printStackTrace();
return "login";
}
}
在UserRealm中添加简单验证
protected AuthenticationInfo doGetAuthenticationInfo(AuthenticationToken authenticationToken) throws AuthenticationException {
    System.out.println("执行认证逻辑");
    //模拟数据
    String username = "jack";
    String password = "123456";

    //1、判断用户名,token中的用户信息时登录的时候传进来的
    UsernamePasswordToken token = (UsernamePasswordToken)authenticationToken;
    // 验证用户是否存在,如果是数据库操作,这里肯定是userService.findByUsername(token.getUsername())操作
    // 这里只是简单的先进行字符串的判断
    if(!token.getUsername().equals(username)){
        return null;//返回null,shiro底层会抛出UnknownAccountException
    }

    //2、判断密码
    //参数1:需要返回给login方法的数据
    //参数2:数据库密码
    //参数3:是当前realm的名称
    //这里的对比逻辑是先对比username,当然上面已经比对了,所以肯定是相等的,
    //所以真正比对的是password,从这里传入的password(一般是数据库获取)和token(登录的时候传入的)中的password做对比
    //如果相同就允许登录,不相同,就会抛出IncorrectCredentialsException
    //如果认证的方法不通过,就不会再执行授权的方法了
    return new SimpleAuthenticationInfo("",password,"");
}
用户名错误
 密码错误
密码错误
 登录成功后跳转index.html页面

而且,最重要的是,当我们登录之后,用户信息就自动放入到session中了.
session的Url重写问题
而且现在还有一个bug,当我们关闭浏览器,重新再进行登录的时候,就会自动跳转到http://localhost:8080/login;JSESSIONID=xxxxx的页面,这个是由于shiro内部帮我们自动进行了url重载。原因大致如下:
1、client向server发送请求http://localhost:8080

2、server端经由shiro进行内部内部URL重定向至http://localhost:8080/login

3、server收到http://localhost:8080/login请求后,发现请求头中没有cookie(因为这次请求是server内部重定向的),那么server就认为client端禁用了cookie,并且为这次会话产生唯一标示即SESSIONID,并将SESSIONID追加到http://localhost:8080/login,作为response响应给client。

4、client收到server的响应后,以http://localhost:8080/login;JSESSIONID=XXX 为URL进行请求重定向,最后展示出登陆页
要修改也很简单,关闭session的Url重写就行了,再shiro配置中加入下面的代码
@Configuration
public class ShiroConfig {
    @Bean("userRealm")
    public UserRealm getUserRealm(){
        return new UserRealm();
    }

    @Bean("securityManager")
    public DefaultWebSecurityManager getDefaultWebSecurityManager(UserRealm userRealm,DefaultWebSessionManager sessionManager){
        DefaultWebSecurityManager securityManager = new DefaultWebSecurityManager();
        securityManager.setRealm(userRealm);
        securityManager.setSessionManager(sessionManager);
        return securityManager;
    }

    @Bean
    public DefaultWebSessionManager getDefaultWebSessionManager(){
        DefaultWebSessionManager sessionManager = new DefaultWebSessionManager();
        sessionManager.setSessionIdUrlRewritingEnabled(false);
        return sessionManager;
    }
    ......
}
主要就是加入DefaultWebSessionManager,并将DefaultWebSessionManager加入到securityManager对象中
附录:关于Shiro中的Session管理
整个Shiro中,session关系图:
Session
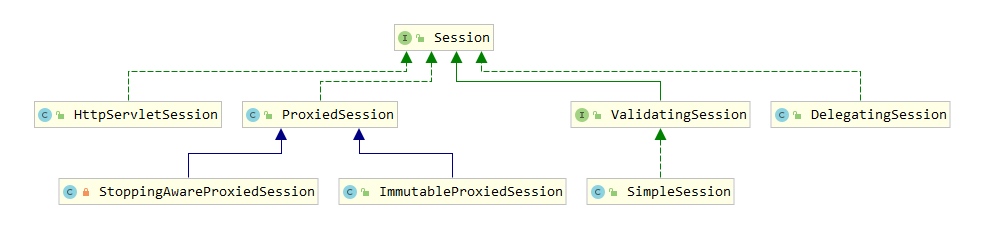
SessionManager
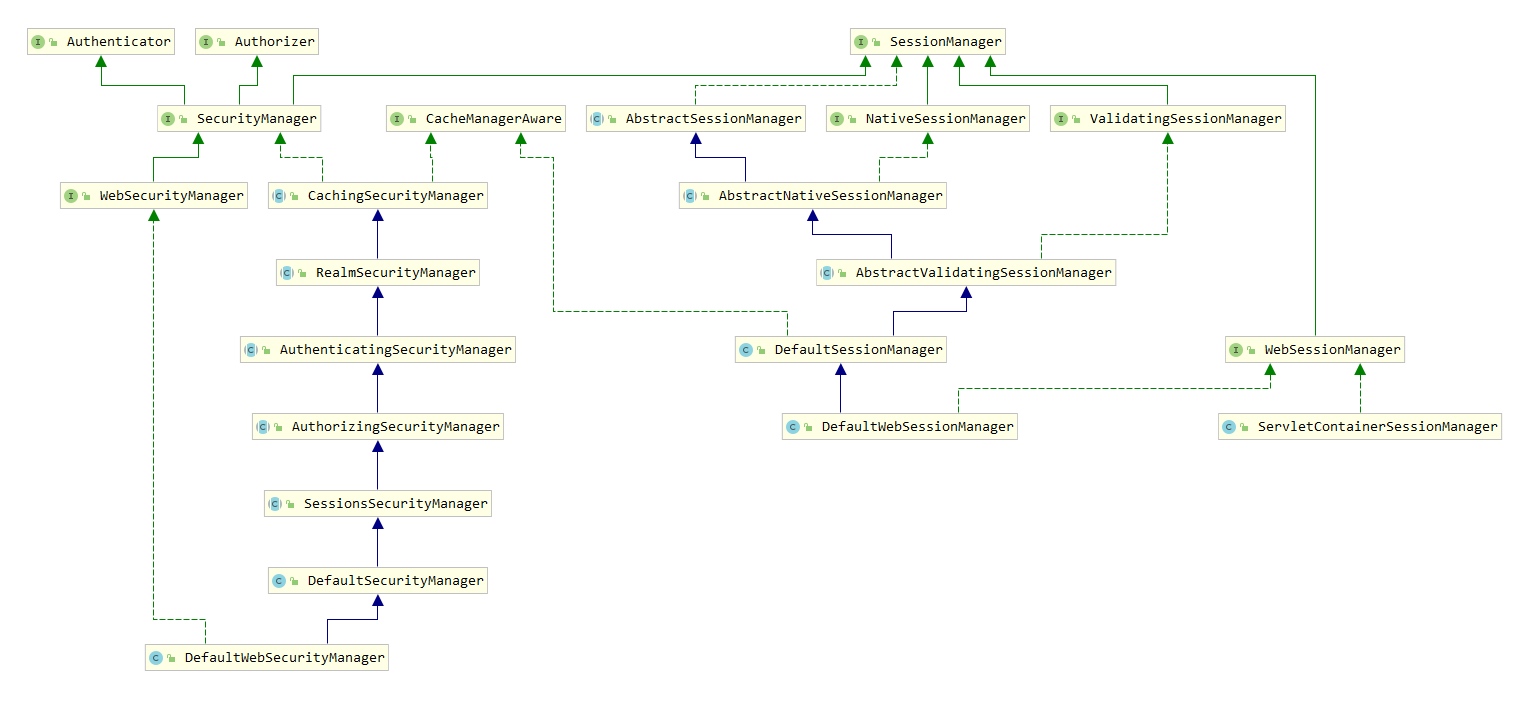
我们在配置Shiro时配置了一个DefaultWebSecurityManager,先来看下
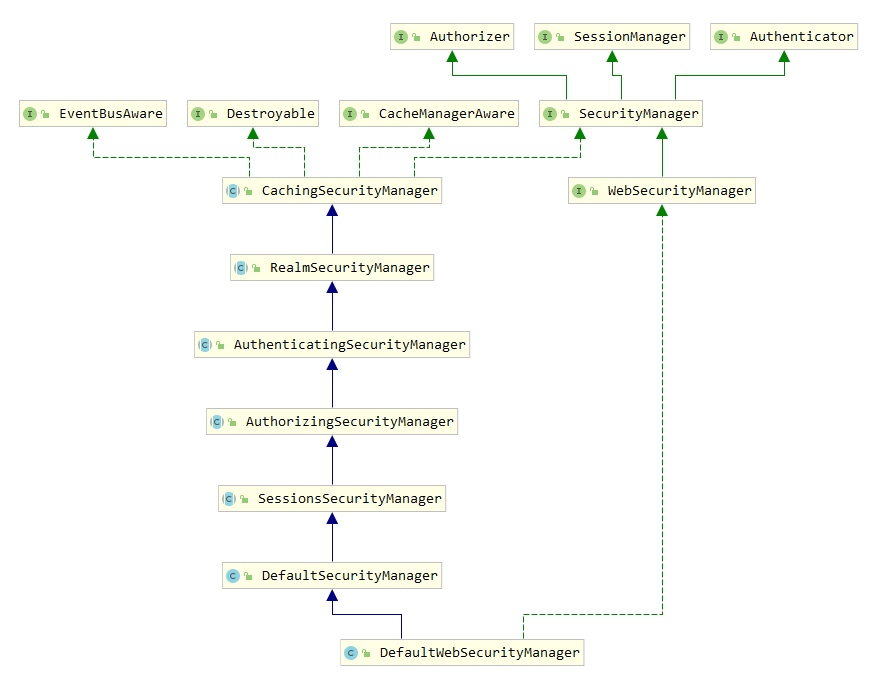
DefaultWebSecurityManager
public DefaultWebSecurityManager() {
    super();
    ((DefaultSubjectDAO) this.subjectDAO).setSessionStorageEvaluator(new DefaultWebSessionStorageEvaluator());
    this.sessionMode = HTTP_SESSION_MODE;
    setSubjectFactory(new DefaultWebSubjectFactory());
    setRememberMeManager(new CookieRememberMeManager());
    setSessionManager(new ServletContainerSessionManager());
}
在它的构造方法中注入了一个ServletContainerSessionManager
public class ServletContainerSessionManager implements WebSessionManager {
    public Session getSession(SessionKey key) throws SessionException {
        if (!WebUtils.isHttp(key)) {
            String msg = "SessionKey must be an HTTP compatible implementation.";
            throw new IllegalArgumentException(msg);
        }
        HttpServletRequest request = WebUtils.getHttpRequest(key);
        Session session = null;
        HttpSession httpSession = request.getSession(false);
        if (httpSession != null) {
            session = createSession(httpSession, request.getRemoteHost());
        }
        return session;
    }

    private String getHost(SessionContext context) {
        String host = context.getHost();
        if (host == null) {
            ServletRequest request = WebUtils.getRequest(context);
            if (request != null) {
                host = request.getRemoteHost();
            }
        }
        return host;
    }

    protected Session createSession(SessionContext sessionContext) throws AuthorizationException {
        if (!WebUtils.isHttp(sessionContext)) {
            String msg = "SessionContext must be an HTTP compatible implementation.";
            throw new IllegalArgumentException(msg);
        }
        HttpServletRequest request = WebUtils.getHttpRequest(sessionContext);
        HttpSession httpSession = request.getSession();
        String host = getHost(sessionContext);
        return createSession(httpSession, host);
    }

    protected Session createSession(HttpSession httpSession, String host) {
        return new HttpServletSession(httpSession, host);
    }
}
ServletContainerSessionManager本身并不管理会话,它最终操作的还是HttpSession,所以只能在Servlet容器中起作用,它不能支持除使用HTTP协议的之外的任何会话。
所以一般我们配置Shiro都会配置一个DefaultWebSessionManager,它继承了DefaultSessionManager,看看DefaultSessionManager的构造方法:
public DefaultSessionManager() {
    this.deleteInvalidSessions = true;
    this.sessionFactory = new SimpleSessionFactory();
    this.sessionDAO = new MemorySessionDAO();
}
这里的sessionDAO初始化了一个MemorySessionDAO,它其实就是一个Map,在内存中通过键值对管理Session。
public MemorySessionDAO() {
    this.sessions = new ConcurrentHashMap<Serializable, Session>();
}
HttpServletSession
public class HttpServletSession implements Session {
    public HttpServletSession(HttpSession httpSession, String host) {
        if (httpSession == null) {
            String msg = "HttpSession constructor argument cannot be null.";
            throw new IllegalArgumentException(msg);
        }
        if (httpSession instanceof ShiroHttpSession) {
            String msg = "HttpSession constructor argument cannot be an instance of ShiroHttpSession.  This " +
                    "is enforced to prevent circular dependencies and infinite loops.";
            throw new IllegalArgumentException(msg);
        }
        this.httpSession = httpSession;
        if (StringUtils.hasText(host)) {
            setHost(host);
        }
    }
    protected void setHost(String host) {
        setAttribute(HOST_SESSION_KEY, host);
    }
    public void setAttribute(Object key, Object value) throws InvalidSessionException {
        try {
            httpSession.setAttribute(assertString(key), value);
        } catch (Exception e) {
            throw new InvalidSessionException(e);
        }
    }
}
Shiro的HttpServletSession只是对javax.servlet.http.HttpSession进行了简单的封装,所以在Web应用中对Session的相关操作最终都是对javax.servlet.http.HttpSession进行的,比如上面代码中的setHost()是将内容以键值对的形式保存在httpSession中。
Comments