
SpingBoot Thymeleaf 模板引擎
一.模板引擎的基本概念
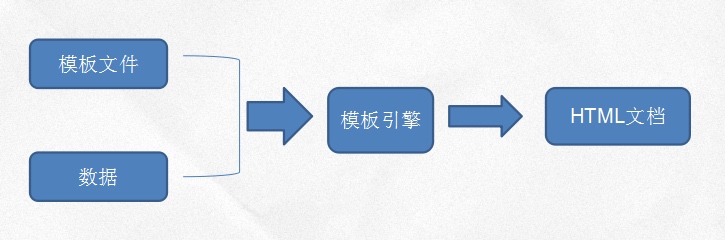
首先,Thymeleaf模板引擎是什么,简单来说,我们的Web工程肯定要生成动态的页面,之前我们使用JSP,要在页面上显示后台数据的时候使用<% %>或者JSTL调用后台数据,也就是后台直接生成HTML页面+数据的页面,直接传送到前台显示,JSP就是我们接触到的一个模板引擎.
总而言之一句话:模板引擎在服务器端将模板和数据合成,返回最终的html页面,常见的模板引擎有freemarker、velocity、thymeleaf等
对于SpringBoot来说官方建议的模板引擎是Thymeleaf,其实和我们喜闻乐见的JSP相比,就是把<%%>换成了Thymeleaf的标记而已.
二、其他一些模板引擎
2.1、SpringBoot整合JSP
首先,IDEA默认创建的SpringBoot工程是没有webapp目录的,所以需要我们手动创建webapp目录,要使用jsp整合,这一步是必须的
而且一般为了防止外部直接访问jsp页面,所以一般有数据的jsp页面都是放在/webapp/WEB-INF/ 目录下的,创建后大致如下:
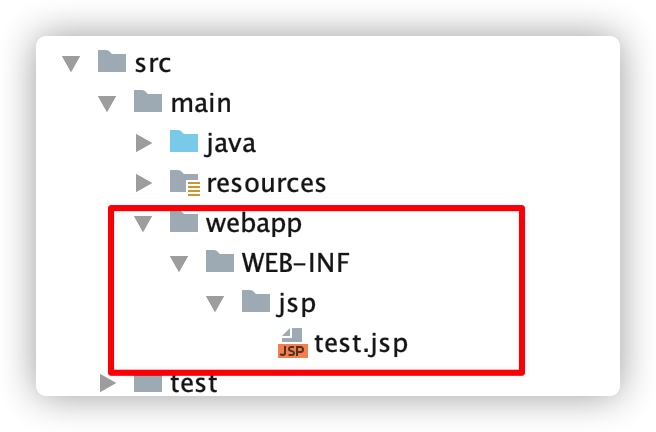
当然,在创建jsp文件的时候,会发现默认IDEA并没有直接创建jsp的图标,这个最好在项目设置中配置一下就好了

添加POM坐标:
<dependency>
    <groupId>org.springframework.boot</groupId>
    <artifactId>spring-boot-starter-web</artifactId>
</dependency>
<!--jstl-->
<dependency>
    <groupId>javax.servlet</groupId>
    <artifactId>jstl</artifactId>
</dependency>
<!-- 使用jsp引擎,springboot内置tomcat没有此依赖 -->
<dependency>
    <groupId>org.apache.tomcat.embed</groupId>
    <artifactId>tomcat-embed-jasper</artifactId>
    <scope>provided</scope>
</dependency>
application.properties
spring.mvc.view.prefix=/WEB-INF/jsp/
spring.mvc.view.suffix=.jsp
Controller
@Controller
public class HelloController {
    @GetMapping("/hello")
    public String index(ModelMap map){
        List<String> list = new ArrayList<>();
        list.add("aaaa");
        list.add("bbb");
        list.add("ccc");
        list.add("ddd");
        map.addAttribute("list",list);
        return "test";
    }
}
JSP页面
<%@page language="java" contentType="text/html; charset=utf-8" pageEncoding="utf-8" %>
<%@taglib prefix="c" uri="http://java.sun.com/jsp/jstl/core" %>
<!doctype html>
<html lang="en">
<head>
    <meta charset="UTF-8">
    <meta name="viewport"
          content="width=device-width, user-scalable=no, initial-scale=1.0, maximum-scale=1.0, minimum-scale=1.0">
    <meta http-equiv="X-UA-Compatible" content="ie=edge">
    <title>Document</title>
</head>
<body>
    <c:forEach items="${list}" var="obj">
        ${obj} <br>
    </c:forEach>
</body>
</html>
2.2、SpringBoot整合Freemarker
Freemarker其实和jsp差不多,也是后端的一种模板引擎,语法很简单,如果不熟悉的,可以花个几分钟到这里http://freemarker.foofun.cn/index.html学习一下就行了
添加POM坐标:
<!--freemarker的启动器坐标-->
<dependency>
    <groupId>org.springframework.boot</groupId>
    <artifactId>spring-boot-starter-freemarker</artifactId>
</dependency>
配置application.yml或者application.properties
spring:
  freemarker:
    suffix: .ftl
实体类User.java
@Data
@NoArgsConstructor
@AllArgsConstructor
public class User {
    private Integer id;
    private String username;
    private String tel;
}
Controller
@Controller
public class HelloController {

    @RequestMapping("/users")
    public String showUser(ModelMap map){
        List<User> list = new ArrayList<>();
        User user1 = new User(1,"张三1","111111");
        User user2 = new User(2,"张三2","111112");
        User user3 = new User(3,"张三3","111113");
        User user4 = new User(4,"张三4","111114");
        list.add(user1);list.add(user2);list.add(user3);list.add(user4);
        map.addAttribute("users",list);
        return "users";
    }
}
编写视图
注意:SpringBoot要求模板形式的视图层技术的文件,必须要放入到src/main/resources目录下,而且必须要一个名称为templates的的文件夹
<!doctype html>
<html lang="en">
<head>
    <meta charset="UTF-8">
    <title>Document</title>
</head>
<body>
<ul>
    <#list users as user>
       <#if user.id % 2 == 0>
          <li style="background-color: beige">${user.username} --- ${user.tel}</li>
       <#else >
           <li style="background-color: aqua">${user.username} --- ${user.tel}</li>
       </#if>
    </#list >
</ul>
</body>
</html>
三、Thymeleaf的特点
动静结合:Thymeleaf 在有网络和无网络的环境下皆可运行,即它可以让美工在浏览器查看页面的静态效果,也可以让程序员在服务器查看带数据的动态页面效果。这是由于它支持 html 原型,然后在 html 标签里增加额外的属性来达到模板+数据的展示方式。浏览器解释 html 时会忽略未定义的标签属性,所以 thymeleaf 的模板可以静态地运行;当有数据返回到页面时,Thymeleaf 标签会动态地替换掉静态内容,使页面动态显示。
开箱即用:它提供标准和spring标准两种方言,可以直接套用模板实现JSTL、 OGNL表达式效果,避免每天套模板、该jstl、改标签的困扰。同时开发人员也可以扩展和创建自定义的方言。
多方言支持:Thymeleaf 提供spring标准方言和一个与 SpringMVC 完美集成的可选模块,可以快速的实现表单绑定、属性编辑器、国际化等功能。
与SpringBoot完美整合,SpringBoot提供了Thymeleaf的默认配置,并且为Thymeleaf设置了视图解析器,我们可以像以前操作jsp一样来操作Thymeleaf。代码几乎没有任何区别,就是在模板语法上有区别。
四、SpringBoot与thymeleaf整合
4.1、SpringBoot中Thymeleaf的默认配置
我们先来看一下以前我们在Spring MVC的Controller中最常见的一段代码
@RequestMapping(value="/v", method=RequestMethod.GET)
public String success() {
    return "success";
}
这段代码的意思,相信熟悉Spring MVC的你,都应该知道,无非就是页面输入/v,Spring MVC的视图解析器就会找到返回值success,这里的返回值其实就应该是我们已经在Spring MVC配置文件中配置好的哪个文件夹下的以success开头,并且以相关后缀结束的文件,比如: xxx/xxx/success.jsp
所以针对于SpringBoot,这些东西肯定是已经配置好了的,不过一定要记住,我们的SpringBoot是约定大于配置的. 首先,SpringBoot支持的后台模板引擎不再是JSP,而是Thymeleaf 其次,Thymeleaf的相关配置也已经是约定好了的
org.springframework.boot.autoconfigure.thymeleaf.ThymeleafProperties
在这个类中有很关键的两句配置代码
public static final String DEFAULT_PREFIX = "classpath:/templates/";
public static final String DEFAULT_SUFFIX = ".html";
默认所有的模板文件,都应该放在类资源下的templates文件夹
默认所有的模板文件,都应该以.html后缀结尾
4.2.Thymeleaf的使用
当然,我们现在如果只是在Controller中这么写是没有任何作用的,我们还需要按照约定做以下几步
- 配置pom.xml,加载
thymeleaf的starter
<dependency>
    <groupId>org.springframework.boot</groupId>
    <artifactId>spring-boot-starter-thymeleaf</artifactId>
</dependency>
- 在工程的
resources资源文件夹下创建templates文件夹,所有的模板文件都应该放在这个文件夹下面 - 创建.html模板文件,其实和一般的html没区别,但是最好在html文件开头添加上Thymeleaf的名称空间,不导入其实也没影响,不过在写页面的时候,就没有提示了
<html lang="en" xmlns:th="http://www.thymeleaf.org">
现在工程的结构,基本上是这个样子:
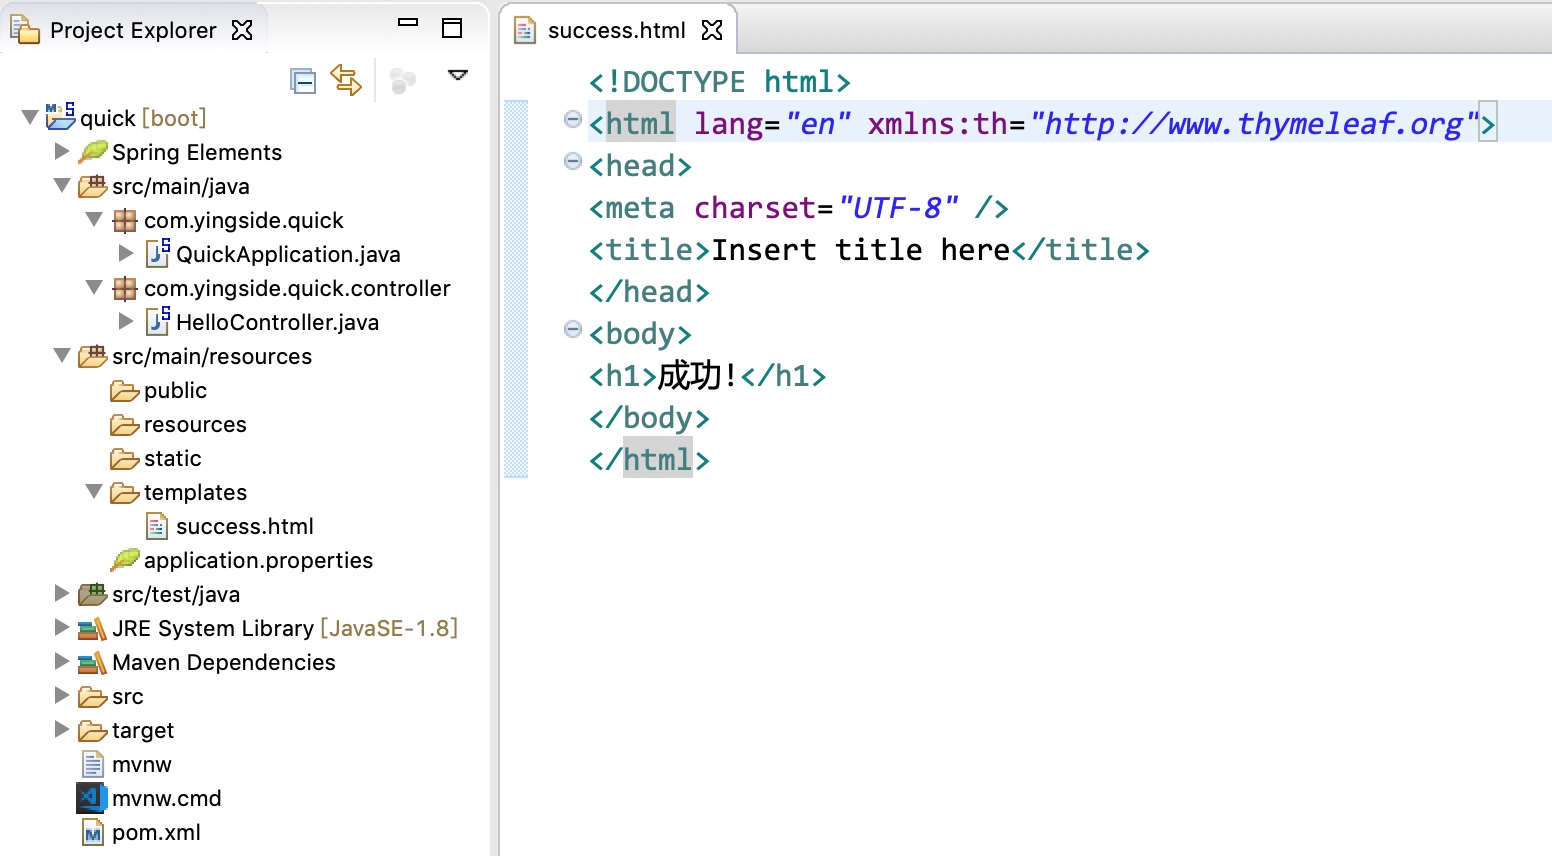 现在的HTML页面也很简单,除了添加的一句代码,和一般的HTML页面任何区别
我们写一段简单代码来测试一下,首先修改HelloController.java文件
HelloController.java
@Controller
public class HelloController {
    @RequestMapping(value="/v", method=RequestMethod.GET)
    public String success(Model model) {
        model.addAttribute("username", "SpringBoot");
        return "success";
    }
}
在HelloController的代码中,我添加了Model对象参数,往页面传值username,接下来,我们在success.html页面,使用Thymeleaf的语法来接收参数 success.html
<!DOCTYPE html>
<html lang="en" xmlns:th="http://www.thymeleaf.org">
<head>
<meta charset="UTF-8" />
<title>Insert title here</title>
</head>
<body>
<h1>成功!</h1>
你好:<span th:text="${username}"></span>
</body>
</html>
页面显示:
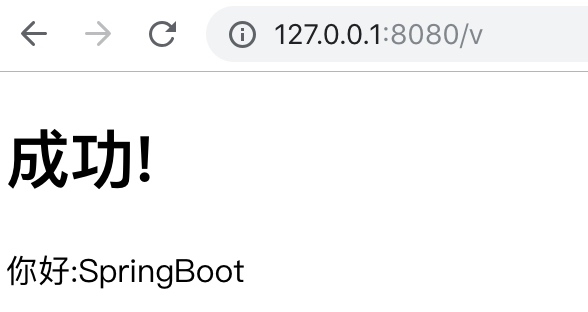 正确得到了Controller中传递的值,这里使用
Thymeleaf的语法th:text="${xxx}"
五、一些历史遗留版本的问题
按照我的例子走下去,如果稍微不留意,估计你的页面就会报错,错误页面大概是这个样子
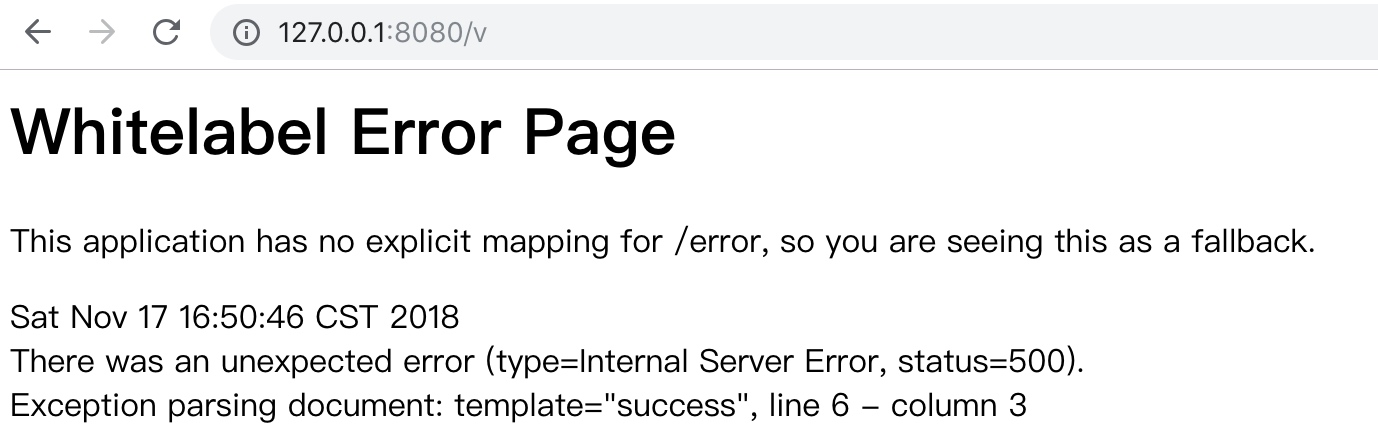 意思是
意思是success页面第6行有错误,success页面不是我们的模板页面吗?而且第6行我们也没有写什么东西啊,为啥会报错?
注意,这其实是thymeleaf自身的问题,在thymeleaf 2.x版本,要求HTML中元素标签必须要闭合,但是在3.x版本中已经不存在该问题了
注意一下,你下载的thymeleaf的版本,现在新版本的SpringBoot应该已经不存在这个问题了,已经使用了最新的thymeleaf版本

如果你现在的thymeleaf版本小于3.0,就需要完成下面的步骤
我们只需要将thymeleaf的版本改为3.x就可以了.
怎么改,在官方文档中有详细的说明,在我们pom.xml文件的properties属性中,加入下面的代码就可以了
<properties>
    <thymeleaf.version>3.0.2.RELEASE</thymeleaf.version>
    <thymeleaf-layout-dialect.version>2.1.1</thymeleaf-layout-dialect.version>
</properties>
这里的thymeleaf.version就是thymeleaf的版本号,当然现在thymeleaf的版本可能已经不止3.0.2了,我们可以到GitHub上查看thymeleaf的最新版本
thymeleaf-layout-dialect其实是thymeleaf的布局管理器,它和thymeleaf.version相对应,所以,我们同样可以再GitHub上找到thymeleaf-layout-dialect最新版本
最终,我们先阶段能够用到最新的thymeleaf 3的版本,可以写成下面这个样子:
<properties>
    <thymeleaf.version>thymeleaf-3.0.11.RELEASE</thymeleaf.version>
    <thymeleaf-layout-dialect.version>2.3.0</thymeleaf-layout-dialect.version>
</properties>
关于Thymeleaf的相关语法,这里就不再做一一介绍了,我们后面通过案例,大家照着做一下,慢慢就熟悉了,这些东西也不需要专门去学习,这里列举Thymeleaf语法常用的表达式
六、.Thymeleaf基本语法
1.属性优先权 th:*
简单来说,这个其实就和JSTL中<c:when>、<c:choose>、<c:forEach>、<c:forTokens>、<c:if>、<c:set>...等等标签类似
具体相关内容如下表:
| 编号 | 描述 | 相关属性 |
|---|---|---|
| 1 | 片段包含 | th:insert th:replace |
| 2 | 遍历 | th:each |
| 3 | 条件判断 | th:if th:unless th:switch th:case |
| 4 | 变量声明 | th:object th:with |
| 5 | 属性修改 | th:attr th:attrprepend th:attrappend |
| 6 | 修改HTML属性默认值 (在HTML属性前加上th,就能获取动态属性值) | th:value th:hrefth:src ... |
| 7 | 标签体内容 | th:text th:utext |
| 8 | 声明片段 | th:fragment |
| 9 | 移除 | th:remove |
2.表达式语法
其实和EL表达式是一个意思,只不过划分的更加详细
(一)简单表达式
  1、变量的表达式:${...}
  2、选择变量表达式:*{...}
  3、信息表达式:#{...}
  4、链接URL表达式:@{...}
(二)字面值
  1、文本文字:'one text', 'Another one!',…
  2、文字数量:0, 34, 3.0, 12.3,…
  3、布尔型常量:true, false
  4、空的文字:null
  5、文字标记:one, sometext, main,…
(四)文本处理
  1、字符串并置:+
  2、文字替换:|The name is ${name}|
(五)表达式基本对象
  1、#ctx:上下文对象
  2、#vars:上下文变量
  3、#locale:上下文语言环境
  4、#httpServletRequest:(只有在Web上下文)HttpServletRequest对象
  5、#httpSession:(只有在Web上下文)HttpSession对象。
(六)实用工具对象
  1、#dates: java.util的实用方法。对象:日期格式、组件提取等.
  2、#calendars:类似于#日期,但对于java.util。日历对象
  3、#numbers:格式化数字对象的实用方法。
  4、#strings:字符串对象的实用方法:包含startsWith,将/附加等。
  5、#objects:实用方法的对象。
  6、#bools:布尔评价的实用方法。
  7、#arrays:数组的实用方法。
  8、#lists:list集合。
  9、#sets:set集合。
  10、#maps:map集合。
  11、#aggregates:实用程序方法用于创建聚集在数组或集合.
  12、#messages:实用程序方法获取外部信息内部变量表达式,以同样的方式,因为它们将获得使用# {…}语法
  13、#ids:实用程序方法来处理可能重复的id属性(例如,由于迭代)。
3、示例
实体类User.java
@Data
@NoArgsConstructor
@AllArgsConstructor
public class User {
    private Integer id;
    private String username;
    private String tel;
    private UserDetail userDetail;

    public User(Integer id, String username, String tel) {
        this.id = id;
        this.username = username;
        this.tel = tel;
    }
}
实体类:UserDetail.java
@Data
@AllArgsConstructor
public class UserDetail {
    private Integer id;
    private String userAddress;
    private Date userBirthday;
}
Controller:
@RequestMapping("/thym")
public String showThym(ModelMap map){

    List<User> users = new ArrayList<>();

    User user1 = new User(1,"张三1","111111");
    UserDetail userDetail = new UserDetail(1,"成都",new Date());
    user1.setUserDetail(userDetail);

    User user2 = new User(2,"李四","2222");
    UserDetail userDetail2 = new UserDetail(2,"绵阳",new Date());
    user2.setUserDetail(userDetail2);

    users.add(user1);users.add(user2);
    map.addAttribute("users",users);
    return "thymeleaf";
}
页面:
<!DOCTYPE html>
<html lang="en" xmlns:th="http://www.thymeleaf.org">
<head>
    <meta charset="UTF-8">
    <title>Title</title>
</head>
<body>
<div th:each="user : ${users}">
    <div th:object="${user}">
        <span th:text="*{id}">编号</span>
        <span th:text="*{username}">姓名</span>
        <span th:text="*{getTel()}">电话</span>
        <span th:text="*{userDetail.userAddress}">住址</span>
        <span th:text="*{#dates.format(userDetail.getUserBirthday(),'yyyy-MM-dd')}">生日</span>
    </div>
</div>
</body>
</html>
Comments