
WebSocket 实战 - 2
Socket.io
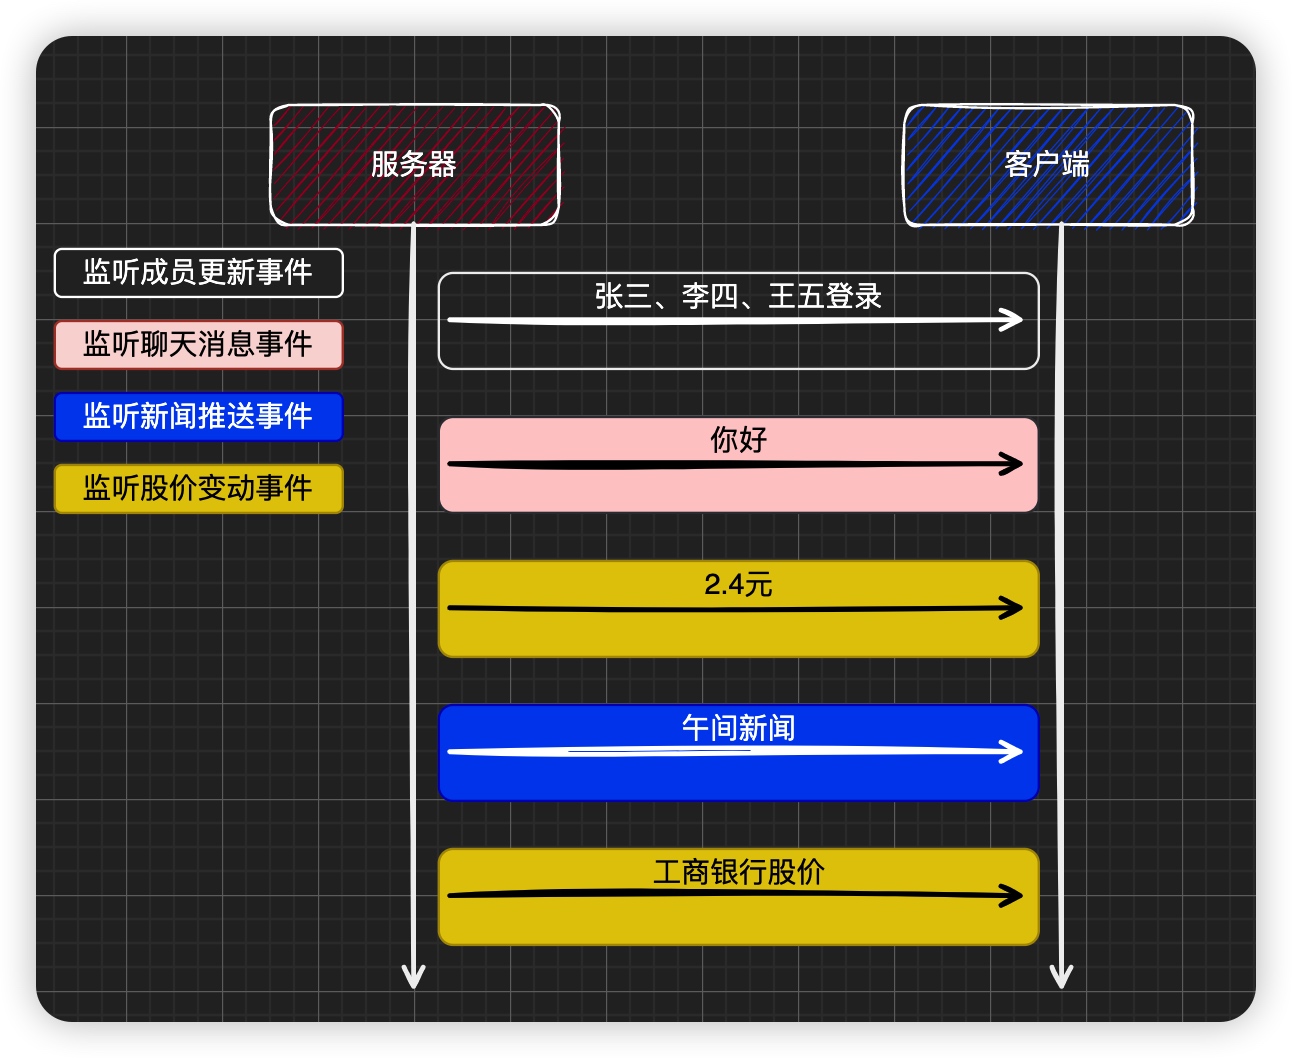
原生的接口虽然简单,但是在实际应用中会造成很多麻烦
比如一个页面,既有K线,也有实时聊天,于是:
sequenceDiagram
服务器->>客户端: 你好
服务器->>客户端: 2.4元
服务器->>客户端: 午间新闻
服务器->>客户端: 工商银行股价
上图是一段时间中服务器给客户端推送的数据,你能区分这些数据都是什么意思吗?
这就是问题所在:连接双方可以在任何时候发送任何类型的数据,另一方必须要清楚这个数据的含义是什么
虽然我们可以自行解决这些问题,但毕竟麻烦
Socket.io帮助我们解决了这些问题,它把消息放到不同的事件中,通过监听和触发事件来实现对不同消息的处理
客户端和服务器双方事先约定好不同的事件,事件由谁监听,由谁触发,就可以把各种消息进行有序管理了.
简单来了,一方有触发,另外一方就需要有监听。

注意,Socket.io为了实现这些要求,对消息格式进行了特殊处理,因此如果一方要使用Socket.io,双方必须都使用
在客户端,使用Socket.io是非常简单的
参见:https://socket.io/docs/v4/client-installation/
在约定事件名时要注意,Socket.io有一些预定义的事件名,比如message、connect等
为了避免冲突,建议自定义事件名使用一个特殊的前缀,比如
$除此之外,Socket.io对低版本浏览器还进行了兼容处理
如果浏览器不支持WebSocket,Socket.io将使用长轮询(long polling)处理
另外,Socket.io还支持使用命名空间来进一步隔离业务,要了解这些高级功能,以及Socket.io的更多API,请参阅其官方文档
服务器端代码
安装
npm i socket.io
socket-chat.js代码实现
const { Server } = require("socket.io");

let history = [];//历史聊天记录{name:string,content:string,date:number}
let nextId = 1;//自动增长游客进入的序号
let users = new Set();//用户集合数组

const io = new Server({
  path: "/",
  cors: {
    origin: "*",
    methods: ["GET", "POST"]
  }
});

io.on("connection", (socket) => {
  const username = "游客 " + nextId++
  users.add(username);

  //广播通知所有用户
  io.emit("$updateUser", [...users]);
  //发送聊天历史记录
  socket.emit("$history", history);
  //告知用户名
  socket.emit("$name", username);

  //监听聊天信息
  socket.on("$message", (content) => {
    const msg = {
      name: username,
      content,
      date:Date.now()
    }
    history.push(msg);

    //广播消息
    socket.broadcast.emit("$message", msg);
  })

  socket.on('disconnect', () => {
    // 清除用户
    users.delete(username);
    // 广播通知所有用户
    socket.broadcast.emit('$updateUser', [...users]);
  });
})

io.listen(9528);
console.log(`Socket.io 聊天室已启动,端口号:9528`);
运行
node socket-chat.js
前端简单测试
<!DOCTYPE html>
<html lang="en">
  <head>
    <meta charset="UTF-8" />
    <meta http-equiv="X-UA-Compatible" content="IE=edge" />
    <meta name="viewport" content="width=device-width, initial-scale=1.0" />
    <title>Document</title>
  </head>
  <body>
    <script src="https://cdn.bootcdn.net/ajax/libs/socket.io/4.5.4/socket.io.min.js"></script>
    <script>
      var socket = io('ws://localhost:9528');

      socket.on('$updateUser', (users) => {
        console.log(`事件 $updateUser 触发了!`, users);
      });

      socket.on('$name', (name) => {
        console.log(`事件 $name 触发了!`, name);
      });
    </script>
  </body>
</html>
前端聊天室
为了使用方便,直接使用Vue来创建聊天室工程
创建前端聊天室工程
vue create client
ChatWindow组件
为了调用方便,直接封装了聊天室组件
<template>
  <div class="container">
    <div class="users">
      <p>聊天室成员</p>
      <ul>
        <li v-for="u in users" :key="u">{{ u }}</li>
      </ul>
    </div>
    <div class="main">
      <div class="content-area" ref="info">
        <div
          class="item"
          :class="{ mine: me === h.name }"
          v-for="(h, i) in history"
          :key="i"
        >
          <div class="name">{{ h.name }}</div>
          <div class="content">{{ h.content }}</div>
          <div class="date">{{ formatDate(h.date) }}</div>
        </div>
      </div>
      <div class="form">
        <textarea v-model="value" @keydown.enter="handleEnter"></textarea>
      </div>
    </div>
  </div>
</template>

<script>
import moment from 'moment';
moment.locale('zh-cn');

export default {
  props: {
    users: {
      type: Array,
      default: () => [],
    },
    history: {
      type: Array,
      default: () => [],
    },
    me: {
      type: String,
      required: true,
    },
  },
  data() {
    return {
      value: '',
    };
  },
  mounted() {
    this.$watch(
      'history',
      () => {
        const div = this.$refs.info;
        div.scroll(0, div.scrollHeight);
      },
      { immediate: true }
    );
  },
  methods: {
    formatDate(date) {
      date = moment(date);
      return date.fromNow();
    },
    handleEnter() {
      const v = this.value.trim();
      if (v) {
        this.value = '';
        this.$emit('chat', { name: this.me, content: v, date: Date.now() });
      }
    },
  },
};
</script>

<style scoped>
.container {
  background: #fff;
  width: 665px;
  height: 450px;
  display: flex;
  border-radius: 5px;
  box-shadow: -2px 2px 2px rgba(0, 0, 0, 0.5);
  overflow: hidden;
}
.users {
  width: 150px;
  border-right: 1px solid #ccc;
  line-height: 30px;
  overflow: auto;
  flex: 0 0 auto;
}
.users p {
  text-align: center;
  border-bottom: 1px solid #ccc;
}
.users li {
  padding: 0 10px;
  font-size: 12px;
  border-bottom: 1px solid #ccc;
  background: #f1f1f1;
}
.users li:nth-child(2n) {
  background: #fff;
}

.main {
  flex: 1 1 auto;
  background: #f1f1f1;
  display: flex;
  flex-direction: column;
}
.content-area {
  height: 400px;
  padding: 1em;
  overflow: auto;
  border-bottom: 1px solid #ccc;
  font-size: 14px;
  line-height: 1.5;
  flex: 0 0 auto;
  scroll-behavior: smooth;
}
.item {
  float: left;
  max-width: 70%;
  clear: both;
  margin-bottom: 1em;
}
.name {
  font-size: 12px;
  color: #666;
}
.date {
  color: #bbb;
  font-size: 12px;
  text-align: right;
}
.content {
  background: #fff;
  border-radius: 5px;
  padding: 10px;
  margin: 5px 0;
}
.mine.item {
  float: right;
}
.mine .content {
  background: #a9e97a;
}
.mine .name {
  text-align: right;
}
.mine .date {
  text-align: left;
}
.form {
  flex: 1 1 auto;
}
.form textarea {
  width: 100%;
  height: 100%;
  resize: none;
  border: none;
  outline: none;
  padding: 20px;
}
</style>
在组件中,为了时间使用方便,使用了moment时间管理库
moment.js 文档地址:http://momentjs.cn/docs/ 实用显示函数 fromNow() http://momentjs.cn/docs/#/displaying/fromnow/
所以使用上面的组件,需要安装moment库
npm i moment
调用
在App.vue中调用组件,这里需要使用Socket.io,因此需要引入客户端Socket.io库。
安装
npm install socket.io-client
App.vue
<template>
  <div id="app">
    <ChatWindow
      v-if="!isLoading"
      :me="me"
      :history="history"
      :users="users"
      @chat="handleChat"
    />
  </div>
</template>

<script>
import ChatWindow from "@/components/ChatWindow.vue";
import { io } from "socket.io-client"
export default {
  name: 'App',
  components: {
    ChatWindow
  },
  data() {
    return {
      history: [],
      me: '',
      users: [],
      isLoading: true,
      socket:null
    }
  },
  created() {
    this.socket = io('ws://localhost:9528');
    this.socket.on('connect', () => {
      this.isLoading = false;
    });
    this.socket.on('$updateUser', (users) => {
      this.users = users;
    });
    this.socket.on('$name', (name) => {
      this.me = name;
    });
    this.socket.on('$history', (history) => {
      this.history = history;
    });
    this.socket.on('$message', (msg) => {
      this.history.push(msg);
    });
  },
  beforeDestroy() {
    this.socket.disconnect();
  },
  methods: {
    handleChat(msg) {
      this.history.push(msg);
      this.socket.emit('$message', msg.content);
    },
  },
}
</script>

<style>
#app {
  width: 100%;
  height: 100%;
  position: fixed;
  left: 0;
  top: 0;
  background: #1e1e1e;
  display: flex;
  justify-content: center;
  align-items: center;
}
* {
  margin: 0;
  padding: 0;
  box-sizing: border-box;
  list-style: none;
}
</style>
Comments