
MyBatis(四) 级联查询与懒加载
涉及到数据库的级联查询,那肯定就要提到一对一,一对多,多对多这样的表关系,以及java程序与之对应的类和类之间的表现形式,我这里主要通过一对多的表关系给大家介绍以下MyBatis里面对于级联关系的处理,至于一对一与多对多,处理的方式和一对多是一样的.
无论怎么样,先在我们之前的crm数据库中添加两张表
一.员工表与部门表
use `crm`;

DROP TABLE IF EXISTS `t_dept`;
CREATE TABLE `t_dept` (
  `dept_id` int(11) NOT NULL AUTO_INCREMENT,
  `dept_name` varchar(50) DEFAULT NULL,
  `dept_info` varchar(255) DEFAULT NULL,
  `dept_createDate` datetime DEFAULT NULL,
  PRIMARY KEY (`dept_id`)
) ENGINE=InnoDB CHARSET=utf8mb4;

INSERT INTO `t_dept` VALUES ('1', '财务部', '财务结算,员工工资,企业盈亏', '2019-01-01 15:37:48'),
('2', '市场部', '市场调研,市场营销,产品企划', '2019-01-01 15:39:09'),
('3', '开发部', '公司技术引进、新产品开发研究、新技术推广应用、技术标准制定、技术指导与监督、协调、管理的权利,并承担执行公司规程及工作。', '2019-01-01 15:40:07');

DROP TABLE IF EXISTS `t_emp`;
CREATE TABLE `t_emp` (
  `emp_id` int(11) NOT NULL AUTO_INCREMENT,
  `emp_name` varchar(50) NOT NULL,
  `emp_tel` varchar(11) NOT NULL,
  `emp_education` varchar(50) DEFAULT NULL,
  `emp_birthday` date DEFAULT NULL,
  `fk_dept_id` int(11) DEFAULT NULL,
  PRIMARY KEY (`emp_id`),
  KEY `fk_dept_id` (`fk_dept_id`),
  CONSTRAINT `t_emp_ibfk_1` FOREIGN KEY (`fk_dept_id`) REFERENCES `t_dept` (`dept_id`)
) ENGINE=InnoDB CHARSET=utf8mb4;

INSERT INTO `t_emp` VALUES ('1', '宋江', '18800000001', '本科', '1990-01-01', '2'),
 ('2', '卢俊义', '18800000002', '研究生', '1991-02-01', '2'),
 ('3', '吴用', '18800000003', '研究生', '1994-02-11', '3'),
 ('4', '公孙胜', '18800000004', '研究生', '1989-10-13', '1'),
  ('5', '关胜', '18800000005', '本科', '1993-05-06', '2'),
  ('6', '林冲', '18800000006', '本科', '1996-11-11', '3'),
  ('7', '秦明', '18800000007', '大专', '1992-07-09', '2'),
  ('8', '呼延灼', '18800000008', '研究生', '1997-11-12', '3'),
  ('9', '花荣', '18800000009', '本科', '1996-10-30', '3'),
  ('10', '柴进', '18800000010', '大专', '1992-11-11', '1');
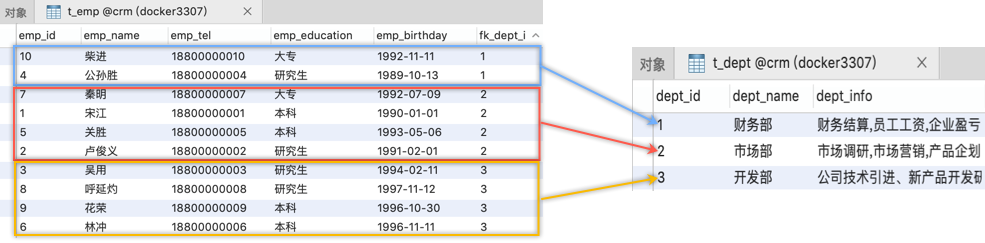
部门表,员工表是很明显的一对多,或者说多对一的表关系,这样的数据库表关系,我们在java代码中建立的javabean实体类应该是下面这个样子的
二.员工类与部门类
Dept.java:
import java.util.Date;
import java.util.List;
public class Dept {
    private int deptId;
    private String deptName;
    private String deptInfo;
    private Date deptCreateDate;
    private List<Employee> employeeList;

    public int getDeptId() {
        return deptId;
    }

    public void setDeptId(int deptId) {
        this.deptId = deptId;
    }

    public String getDeptName() {
        return deptName;
    }

    public void setDeptName(String deptName) {
        this.deptName = deptName;
    }

    public String getDeptInfo() {
        return deptInfo;
    }

    public void setDeptInfo(String deptInfo) {
        this.deptInfo = deptInfo;
    }

    public Date getDeptCreateDate() {
        return deptCreateDate;
    }

    public void setDeptCreateDate(Date deptCreateDate) {
        this.deptCreateDate = deptCreateDate;
    }

    public List<Employee> getEmployeeList() {
        return employeeList;
    }

    public void setEmployeeList(List<Employee> employeeList) {
        this.employeeList = employeeList;
    }

    @Override
    public String toString() {
        return "Dept{" +
                "deptId=" + deptId +
                ", deptName='" + deptName + '\'' +
                ", deptInfo='" + deptInfo + '\'' +
                ", deptCreateDate=" + deptCreateDate +
                ", employeeList=" + employeeList +
                '}';
    }
}
Employee.java:
import java.util.Date;
public class Employee {
    private int empId;
    private String empName;
    private String empTel;
    private String empEducation;
    private Date empBirthday;
    private Dept dept;

    public int getEmpId() {
        return empId;
    }

    public void setEmpId(int empId) {
        this.empId = empId;
    }

    public String getEmpName() {
        return empName;
    }

    public void setEmpName(String empName) {
        this.empName = empName;
    }

    public String getEmpTel() {
        return empTel;
    }

    public void setEmpTel(String empTel) {
        this.empTel = empTel;
    }

    public String getEmpEducation() {
        return empEducation;
    }

    public void setEmpEducation(String empEducation) {
        this.empEducation = empEducation;
    }

    public Date getEmpBirthday() {
        return empBirthday;
    }

    public void setEmpBirthday(Date empBirthday) {
        this.empBirthday = empBirthday;
    }

    public Dept getDept() {
        return dept;
    }

    public void setDept(Dept dept) {
        this.dept = dept;
    }

    @Override
    public String toString() {
        return "Employee{" +
                "empId=" + empId +
                ", empName='" + empName + '\'' +
                ", empTel='" + empTel + '\'' +
                ", empEducation='" + empEducation + '\'' +
                ", empBirthday=" + empBirthday +
                ", dept=" + dept +
                '}';
    }
}
一对多在类关系中的表述就是:
一个Employee对象只会在一个Dept部门中,所以在Employee类中有一个Dept的属性
而一个Dept部门下则会有多个Employee对象员工,因此在Dept类中有一个List
三.一对多,多对一在Mapper中的标签描述
有了实体类,那肯定要根据实体类来做Dao层的相关数据库操作,我们这里还没有建立三层架构,所以,先根据Dept和Employee建立相关的Mapper.xml文件 DeptMapper.xml:
<?xml version="1.0" encoding="UTF-8" ?>
<!DOCTYPE mapper PUBLIC "-//mybatis.org//DTD Mapper 3.0//EN" "http://mybatis.org/dtd/mybatis-3-mapper.dtd">
<mapper namespace="com.yingside.mapper.DeptMapper">
    ...
</mapper>
EmployeeMapper.xml:
<?xml version="1.0" encoding="UTF-8" ?>
<!DOCTYPE mapper PUBLIC "-//mybatis.org//DTD Mapper 3.0//EN" "http://mybatis.org/dtd/mybatis-3-mapper.dtd">
<mapper namespace="com.yingside.mapper.EmployeeMapper">
    ...
</mapper>
1.使用association关联一端
写法一: 通过表连接查询直接嵌套结果
现在的关键点是,如果我要根据主键id查询员工,同时还要显示员工所在部门的信息,这样我们首先想到的应该是数据库的表连接查询
SELECT
t_emp.emp_id,
t_emp.emp_name,
t_emp.emp_tel,
t_emp.emp_education,
t_emp.emp_birthday,
t_dept.dept_id,
t_dept.dept_name,
t_dept.dept_info,
t_dept.dept_createDate
FROM
t_emp
JOIN t_dept
ON t_emp.fk_dept_id = t_dept.dept_id
where t_emp.emp_id=1
像这种的连接查询,以前的JDBC查询,我们一般会像下面这样写:
...
Employee emp = null;
if(rs.next()){
    //创建Employee对象
    emp = new Employee();
    emp.setEmpId(rs.getInt("emp_id"));
    emp.setEmpTel(rs.getString("emp_tel"));
    ...
    //创建Dept对象
    Dept dept = new Dept();
    dept.setDeptId(rs.getInt("dept_id"));
    dept.setDeptName(rs.getString("dept_name"));
    ...
    //把dept对象放入到emp员工对象中
    emp.setDept(dept);
   }
...
现在我们有了Mybatis,可以在Mapper.xml中进行配置,直接实现从数据库读取到实体类数据的注入,不过需要我们进行配置,不过配置的理念和上面代码的写法差不多
<?xml version="1.0" encoding="UTF-8" ?>
<!DOCTYPE mapper PUBLIC "-//mybatis.org//DTD Mapper 3.0//EN" "http://mybatis.org/dtd/mybatis-3-mapper.dtd">
<mapper namespace="com.yingside.mapper.EmployeeMapper">
    <sql id="empBaseColumn">
        t_emp.emp_id,
        t_emp.emp_name,
        t_emp.emp_tel,
        t_emp.emp_education,
        t_emp.emp_birthday,
        t_emp.fk_dept_id
    </sql>

    <sql id="deptBaseColumn">
        t_dept.dept_id,
        t_dept.dept_name,
        t_dept.dept_info,
        t_dept.dept_createDate
    </sql>

    <resultMap id="employeeMap" type="employee">
        <id column="emp_id" property="empId"></id>
        <result column="emp_name" property="empName"></result>
        <result column="emp_tel" property="empTel"></result>
        <result column="emp_education" property="empEducation"></result>
        <result column="emp_birthday" property="empBirthday"></result>
        <association property="dept" javaType="Dept">
            <id column="dept_id" property="deptId"></id>
            <result column="dept_name" property="deptName"></result>
            <result column="dept_info" property="deptInfo"></result>
            <result column="dept_createDate" property="deptCreateDate"></result>
        </association>
    </resultMap>

    <select id="getEmployeeById" resultMap="employeeMap" parameterType="int">
      select
      <include refid="empBaseColumn"></include>,<include refid="deptBaseColumn"></include>
      from t_emp join t_dept on t_emp.fk_dept_id = t_dept.dept_id
      where t_emp.emp_id=#{id}
    </select>
</mapper>
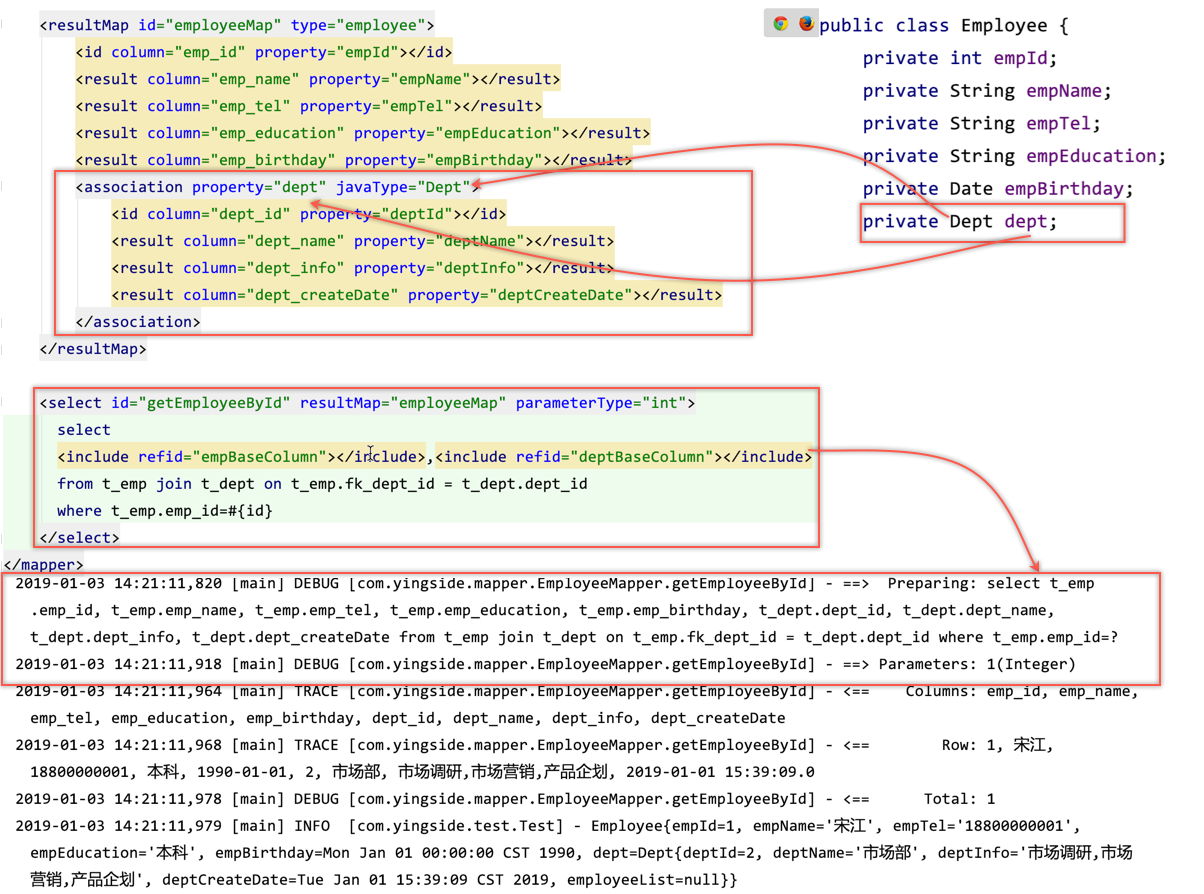
在xml里面设置关联关系,其实最重要的就是resultMap标签的设置
association: 只要是关联到一的那一端,就需要用到<association>标签
property: 对应的属性名
javaType: 对应的类名,注意如果全局没有通过
测试类中添加如下代码: Test.java
......
//通过主键id获取Employee对象信息
@org.junit.Test
public void testGetEmployeeById(){
    String stmt = "com.yingside.mapper.EmployeeMapper.getEmployeeById";
    Employee employee = sqlSession.selectOne(stmt,1);
    log.info(employee);
    sqlSession.close();
}
......
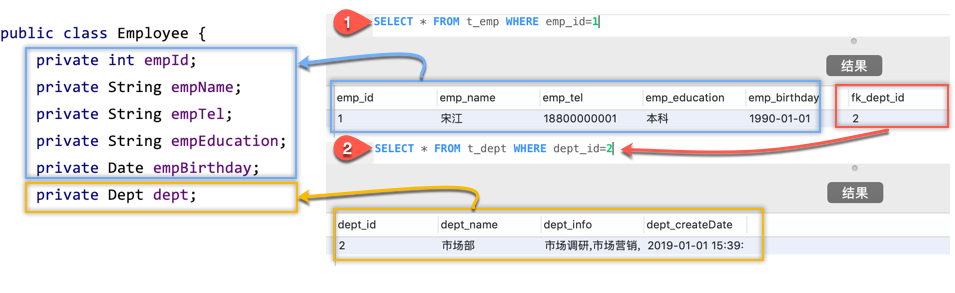
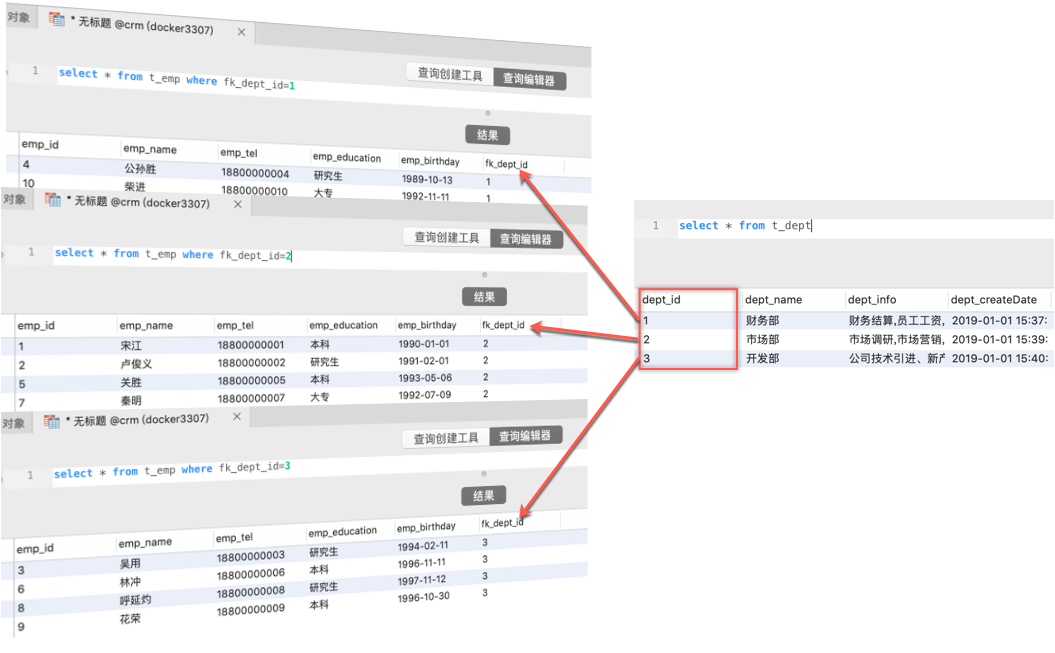
写法二: 通过嵌套查询执行另外一个SQL映射语句来返回预期的复杂类型
意思是,比如先执行:
select * from t_emp where emp_id=1
根据员工id先获取员工所有信息,这样可以获取fk_dept_id=2,然后再根据这个获取的部门id执行:
select * from t_dept where dept_id=2
获取部门id=2的所有信息,然后再讲这两个部分数据组成我们Java类中的Employee类型,执行的过程如下图:
 针对这种做法我们之前的XML配置也需要做相应的修改
<?xml version="1.0" encoding="UTF-8" ?>
<!DOCTYPE mapper PUBLIC "-//mybatis.org//DTD Mapper 3.0//EN" "http://mybatis.org/dtd/mybatis-3-mapper.dtd">
<mapper namespace="com.yingside.mapper.EmployeeMapper">
    <sql id="empBaseColumn">
        t_emp.emp_id,
        t_emp.emp_name,
        t_emp.emp_tel,
        t_emp.emp_education,
        t_emp.emp_birthday,
        t_emp.fk_dept_id
    </sql>

    <sql id="deptBaseColumn">
        t_dept.dept_id,
        t_dept.dept_name,
        t_dept.dept_info,
        t_dept.dept_createDate
    </sql>
    <!-- 嵌套查询,先查询出员工相关信息,然后再根据员工信息中的外键id查询部门信息,最后再组合成Employee对象 -->
    <resultMap id="employeeMap" type="employee">
        <id column="emp_id" property="empId"></id>
        <result column="emp_name" property="empName"></result>
        <result column="emp_tel" property="empTel"></result>
        <result column="emp_education" property="empEducation"></result>
        <result column="emp_birthday" property="empBirthday"></result>
        <association property="dept" column="fk_dept_id" select="getDeptById" />
    </resultMap>

    <select id="getDeptById" resultType="dept" parameterType="int">
        select <include refid="deptBaseColumn"></include>
        from t_dept where dept_id=#{id}
    </select>

    <select id="getEmployeeById" resultMap="employeeMap" parameterType="int">
        select
        <include refid="empBaseColumn"></include>
        from t_emp where emp_id=#{id}
    </select>
</mapper>
主要是在association标签属性的不一样,
property: 表示实体类中的属性值
select: 表示要执行的另外一条SQL语句
column: 表示要执行另外的SQL语句需要引用的字段名,一般情况下也就是关联表的主键或者外键字段
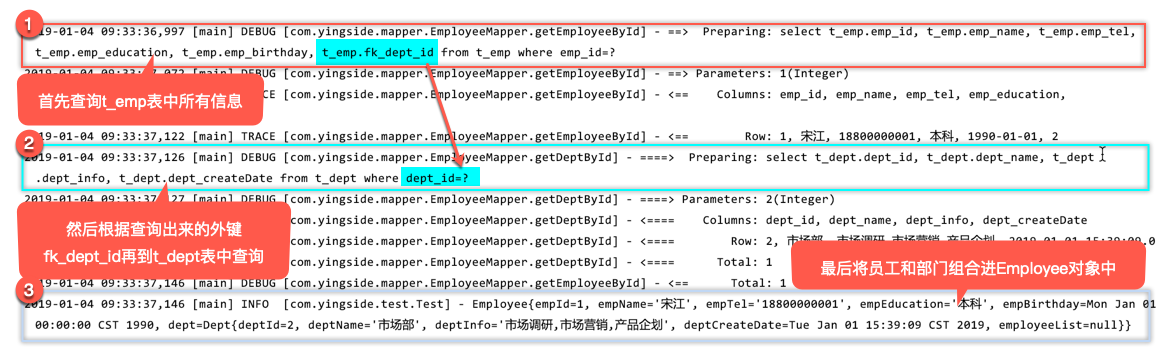
执行测试就能看出和方式一的差别在哪里.
这两种方式都有其自己的优点和缺点,有都有自己具体的应用场合,这是在多对一的这一端的设置,我们来看一下一对多,以部门的角度来看一下XML的设置
2.使用collection关联多端
员工相对于部门是多对一,而部门对于员工则是一对多,现在再来看看在部门这边实现的XML代码 其实还是有两种方式去实现
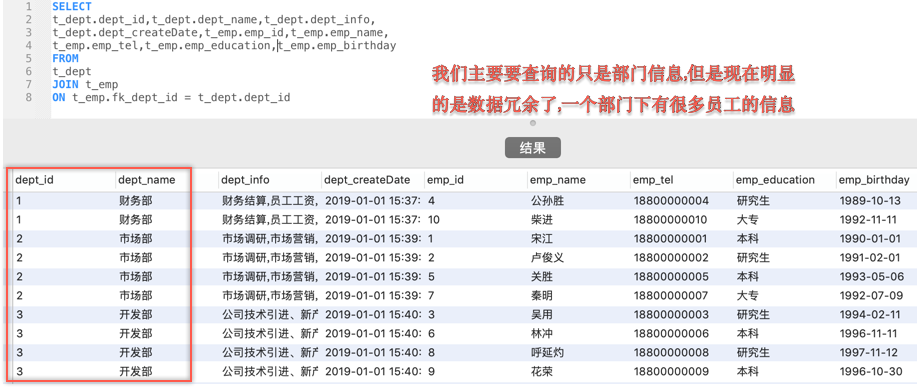
方式一: 通过SQL语句连接查询,直接在javabean中嵌套查询结果
我们这里直接查询所有部门信息
SELECT
t_dept.dept_id,
t_dept.dept_name,
t_dept.dept_info,
t_dept.dept_createDate,
t_emp.emp_id,
t_emp.emp_name,
t_emp.emp_tel,
t_emp.emp_education,
t_emp.emp_birthday
FROM
t_dept
JOIN t_emp
ON t_emp.fk_dept_id = t_dept.dept_id
其实这个查询语句你在SQL工具中查看一下结果就知道,在多的这一段,我们像这样查询并不靠谱
无论怎么样,我们在DeptMapper.xml配置相关内容
DeptMapper.xml:
<?xml version="1.0" encoding="UTF-8" ?>
<!DOCTYPE mapper PUBLIC "-//mybatis.org//DTD Mapper 3.0//EN" "http://mybatis.org/dtd/mybatis-3-mapper.dtd">
<mapper namespace="com.yingside.mapper.DeptMapper">
    <sql id="empBaseColumn">
        t_emp.emp_id,
        t_emp.emp_name,
        t_emp.emp_tel,
        t_emp.emp_education,
        t_emp.emp_birthday,
        t_emp.fk_dept_id
    </sql>

    <sql id="deptBaseColumn">
        t_dept.dept_id,
        t_dept.dept_name,
        t_dept.dept_info,
        t_dept.dept_createDate
    </sql>

    <resultMap id="deptMap" type="dept">
        <id column="dept_id" property="deptId"></id>
        <result column="dept_name" property="deptName"></result>
        <result column="dept_info" property="deptInfo"></result>
        <result column="dept_createDate" property="deptCreateDate"></result>
        <!--
            property:实体类中定义的属性名
            ofType:指定映射到集合中的全类名(包名+类名),我们这里是在全局设置中做了别名处理的typeAliases
        -->
        <collection property="employeeList" ofType="employee">
            <id column="emp_id" property="empId"></id>
            <result column="emp_name" property="empName"></result>
            <result column="emp_tel" property="empTel"></result>
            <result column="emp_education" property="empEducation"></result>
            <result column="emp_birthday" property="empBirthday"></result>
        </collection>
    </resultMap>

    <select id="getDeptList" resultMap="deptMap">
        SELECT
        t_dept.dept_id,
        t_dept.dept_name,
        t_dept.dept_info,
        t_dept.dept_createDate,
        t_emp.emp_id,
        t_emp.emp_name,
        t_emp.emp_tel,
        t_emp.emp_education,
        t_emp.emp_birthday,
        t_emp.fk_dept_id
        FROM
        t_dept
        JOIN t_emp
        ON t_emp.fk_dept_id = t_dept.dept_id
    </select>
</mapper>
在测试类中添加如下代码: Test.java
......
//查询部门所有信息
@org.junit.Test
public void testGetDeptList(){
    String stmt = "com.yingside.mapper.DeptMapper.getDeptList";
    List<Dept> depts = sqlSession.selectList(stmt);
    log.info(depts);
    sqlSession.close();
}
......
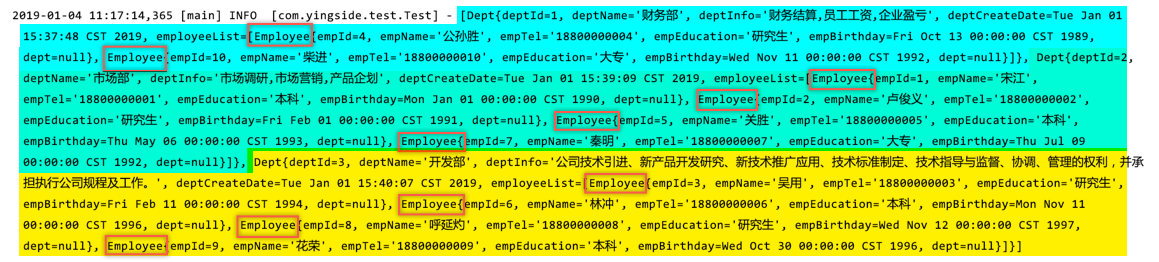
这里的查询其实就有一个问题值得探讨了,其实我们主要要查询的是部门信息,查出来之后其实只应该有3条数据,而使用join级联查询员工数据之后变成了10条,那么MyBatis是如何去除重复和在Dept对象中插入List
答案其实就是我们编写的<resultMap>
MyBatis根据resultMap中的<id>标签来识别哪些数据是主数据来去除重复,<collection>标签把子数据插入到集合中
写法二: 通过嵌套查询执行另外一个SQL映射语句来返回预期的复杂类型
和上面多对一的方式二概念是一样的,只是这里换成了先查询部门信息,然后再根据部门信息查找这个部门下所有的员工信息
重新改写一下DeptMapper.xml文件
DeptMapper.xml
<?xml version="1.0" encoding="UTF-8" ?>
<!DOCTYPE mapper PUBLIC "-//mybatis.org//DTD Mapper 3.0//EN" "http://mybatis.org/dtd/mybatis-3-mapper.dtd">
<mapper namespace="com.yingside.mapper.DeptMapper">
    <sql id="empBaseColumn">
        t_emp.emp_id,
        t_emp.emp_name,
        t_emp.emp_tel,
        t_emp.emp_education,
        t_emp.emp_birthday,
        t_emp.fk_dept_id
    </sql>

    <sql id="deptBaseColumn">
        t_dept.dept_id,
        t_dept.dept_name,
        t_dept.dept_info,
        t_dept.dept_createDate
    </sql>
    <resultMap id="deptMap" type="dept">
        <id column="dept_id" property="deptId"></id>
        <result column="dept_name" property="deptName"></result>
        <result column="dept_info" property="deptInfo"></result>
        <result column="dept_createDate" property="deptCreateDate"></result>
        <collection property="employeeList" ofType="employee" select="getEmployeeList" column="dept_id"></collection>
    </resultMap>

    <select id="getEmployeeList" resultType="employee" parameterType="int">
        select * from t_emp where fk_dept_id=#{id}
    </select>
    <select id="getDeptList" resultMap="deptMap">
        select * from t_dept
    </select>
</mapper>
注意观察打印结果:

无论是多对一还是一对多,都有两种方式去解决连接查询的问题,首先多对一,一对多,无非就是使用的xml标签不一样,多对一,使用<association>标签.一对多,使用<collection>标签,关键点是我们使用了两种方式来处理,应该使用哪种方式?其实主要是根据业务的需求来处理的
四.多表查询方式的选择与优缺点
当然,首先要搞清楚需求,比如
1. 需求: 要查询员工相关信息,但是又要显示部门名称
这样主要要查询多端的信息,但又需要一端的简单数据的情况,在数据不多的情况下,比较推荐大家选择第一种方式
2. 需求: 要查询部门相关信息,但是有时候又需要显示部门下员工的信息
首先这是一对多的情况,主要要显示一这一端的情况,但是有时候又需要显示员工的信息,在这种情况下
第一种方式:直接关联查询出所有部门和员工的信息
SELECT * FROM t_dept JOIN t_emp ON t_emp.fk_dept_id = t_dept.dept_id
分析: (1). 这里我们一次查询出所有的信息,需要什么信息的时候直接从查询的结果中筛选。但是如果部门和员工表都比较大的时候,这种关联查询肯定比较耗时。
(2). 我们的需求是有时候需要关联查询员工信息,这里不是一定需要员工信息的。即有时候不需要查询员工信息,我们也查了,程序进行了多余的耗时操作。
所以在一对多,并且数据量大的情况下,不建议使用这种方式
第二种方式: 分步查询,首先查询出所有的部门信息,然后如果需要员工的信息,我们在根据查询的部门信息去关联员工信息
//查询所有部门信息,注意一定要包括部门主键id,因为员工表外键与主键关联
select * from t_dept
//根据部门id查询员工
select * from t_emp where fk_dept_id=dept_id(上一步查询出来的部门主键)
分析: (1). 这里两步都是单表查询,执行效率比关联查询要高很多 (2). 分为两步,如果我们不需要关联员工信息,那么我们就不必执行第二步,程序没有进行多余的操作。 我们上面已经执行过这样的操作,不过从代码中截图中可以看出,无论怎么样,第二步中员工的信息还是会被查询出来,这是由于我们现在还没有实现懒加载的原因
五.懒加载
通俗的讲就是按需加载,我们需要什么的时候再去进行什么操作。但是一般的情况下可没有直接实现懒加载.而且按照我们上面这种分成两步的做法的话,不但不会加快查询速度,还会造成数据库查询1+N(又叫做N+1)的情况,1+N情况通俗点说就是本来只是查询一条部门信息,但是部门信息下的所有员工也会被查出来,执行一条SQL语句之后还会连带的查询其他多条SQL语句,所以才需要懒加载,在Mybatis中这当然需要我们去进行配置
为了更加清楚的看到效果,首先修改一下测试类的中的代码
//查询部门所有信息
@org.junit.Test
public void testGetDeptList(){
    String stmt = "com.yingside.mapper.DeptMapper.getDeptList";
    List<Dept> depts = sqlSession.selectList(stmt);
    for (Dept dept : depts){
        System.out.println(dept.getDeptName());
    }
    sqlSession.close();
}
注意: 这里只是打印部门的名字,是因为待会我们要测试懒加载,但是如果直接打印这个Dept部门对象的话,会触发toString()方法,toString()方法会触发懒加载,自动的又去调用SQL语句读取部门下的员工信息,所以我们这么做是为了保证,现在我们只是在查看部门的信息
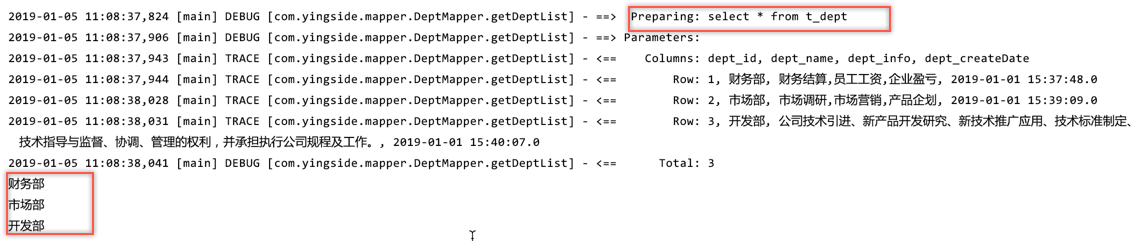
当然现在还没有配置MyBatis懒加载,所以,还是下面截图的效果:
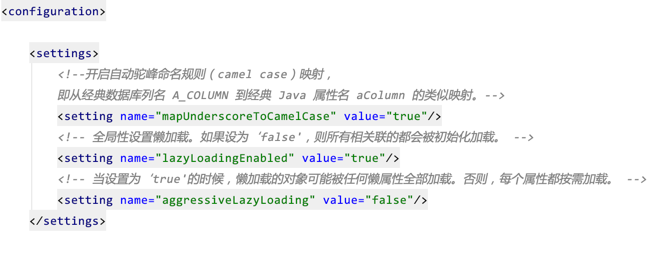
1. Mybatis的懒加载配置
要配置懒加载,只需要在全局MyBatis配置文件,在<settings>中标签中加入下面的配置:
<!-- 全局性设置懒加载。如果设为‘false',则所有相关联的都会被初始化加载。 -->
<setting name="lazyLoadingEnabled" value="true"/>
<!-- 当设置为‘true'的时候,懒加载的对象可能被任何懒属性全部加载。否则,每个属性都按需加载。 -->
<setting name="aggressiveLazyLoading" value="false"/>
很简单,现在就可以了,再执行以下测试
 由于只是打印了部门名称,现在这里明显只是读取了部门信息,而员工信息就没有再去读取了.
比如,我们再次修改一下测试代码
由于只是打印了部门名称,现在这里明显只是读取了部门信息,而员工信息就没有再去读取了.
比如,我们再次修改一下测试代码
//查询部门所有信息
@org.junit.Test
public void testGetDeptList(){
    String stmt = "com.yingside.mapper.DeptMapper.getDeptList";
    List<Dept> depts = sqlSession.selectList(stmt);
    for (Dept dept : depts){
        System.out.println(dept.getDeptName());
    }
    //获取集合中下标为0的部门下所有的员工
    List<Employee> emps1 = depts.get(0).getEmployeeList();
    sqlSession.close();
}
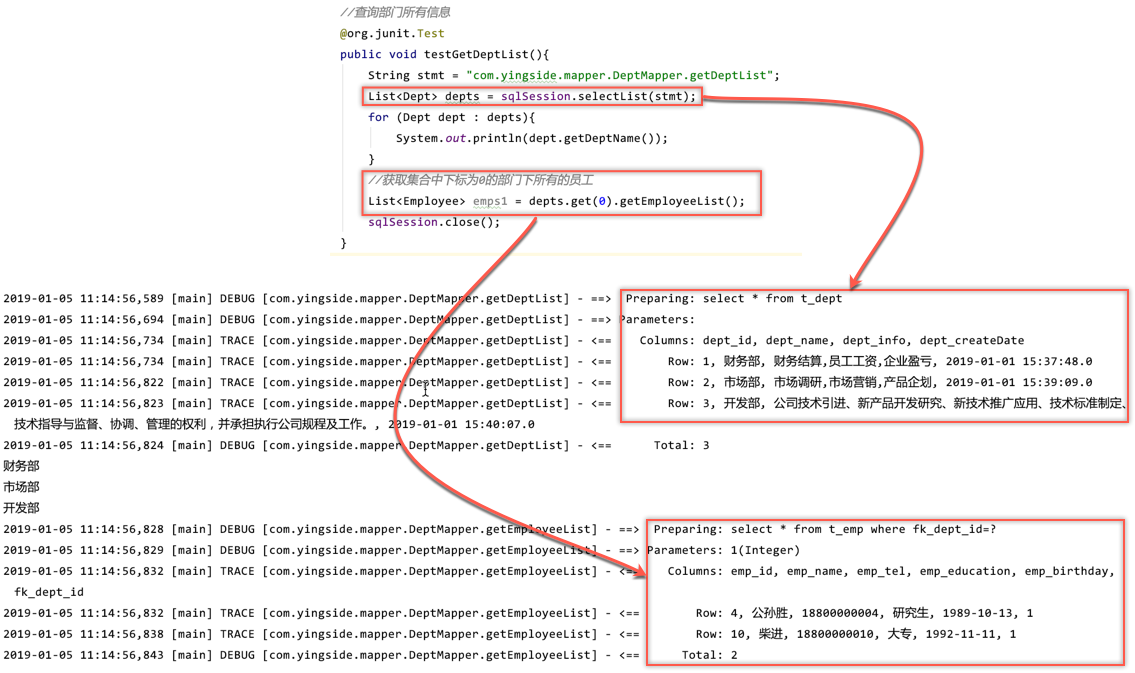 这个过程其实就是界面显示了部门列表,你用鼠标去点击了其中一个部门,然后就看到了这个部门下员工的信息了
2.CGLIB与ASM
如果你使用的是Mybatis3.2.8以前的版本,那么如果执行懒加载的话,会直接报错
java.lang.IllegalStateException: Cannot enable lazy loading because CGLIB is not available. Add CGLIB to your classpath.
意思是还需要加入动态代理的框架包CGLIB,甚至更早的版本还需要你加入字节码框架包ASM,不过这些都随着JDK1.8之后的改变而不在需要了,MyBatis3.3.0以后的版本就已经直接支持Javassist字节码框架并且直接加入了MyBatis的jar包
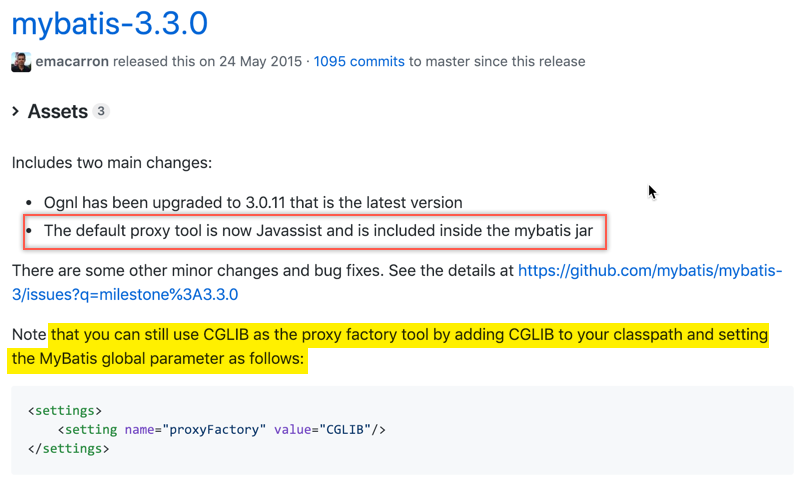
说这个的意思主要是提醒大家如果以后在工作中遇到了早期的Mybatis版本,如果曝出了这个错误是什么原因,加入CGLIB和ASM的包就可以了,现在大家只需要导入MyBatis这一个jar包就可以搞定了
Comments